Inter-Application Midi (Win10)
Monday November 29th 2021, 12:12 pm
Filed under:
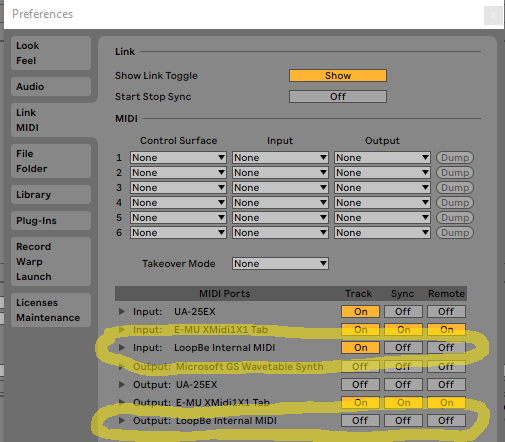
MidiIronically, after nearly thirty years of inter-application MIDI being fairly complicated to set up on Windows, the process now has just one step.
Step 1. Download and install the LoopBe1 driver.
Step 2. That’s it! The LoopBe1 driver is ready to use in your DAW software.
Unreal for iGPU
Thursday June 25th 2020, 8:47 am
Filed under:
UnrealThere are a lot of things that make Unreal appealing in an education environment–it’s free for most purposes, it’s open source, and it has great Linux support–but a common stumbling block is its performance out of the box on lower-end desktop systems with iGPUs, MacBooks in particular. Fortunately Unreal is perfectly capable of running smoothly on almost any 2010s machine if set up properly.
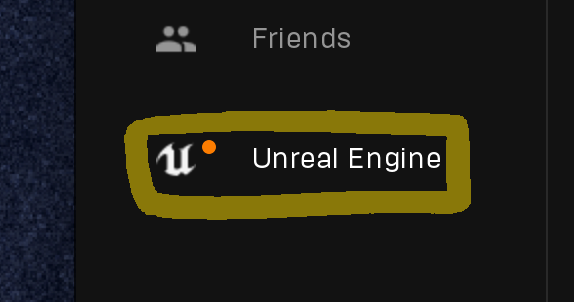
Step 1. If you’re starting from scratch, run the Epic Launcher and go to the Unreal Engine tab.
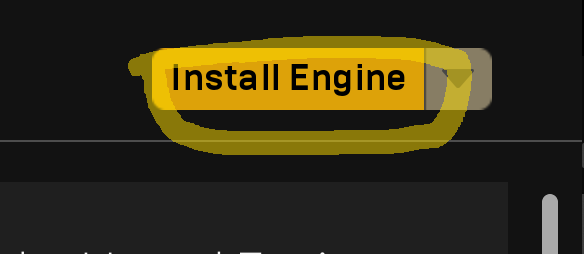
Step 2. Click Install Engine.
Step 3. Unreal is huge; the full install is about 30GB. If you need to save on disk space, click Options.
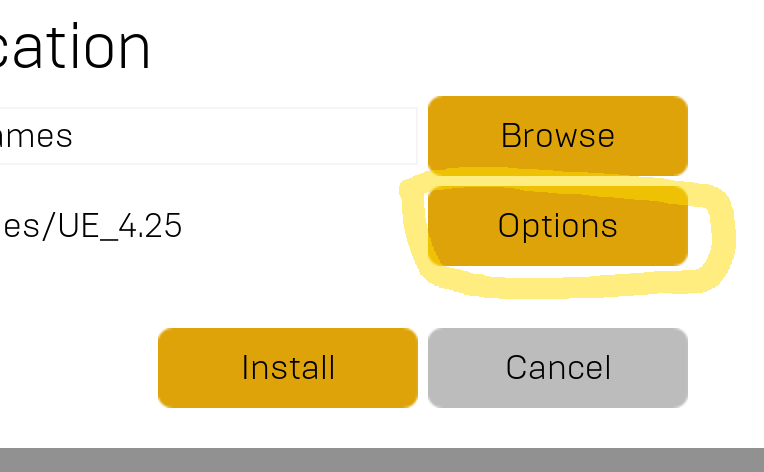
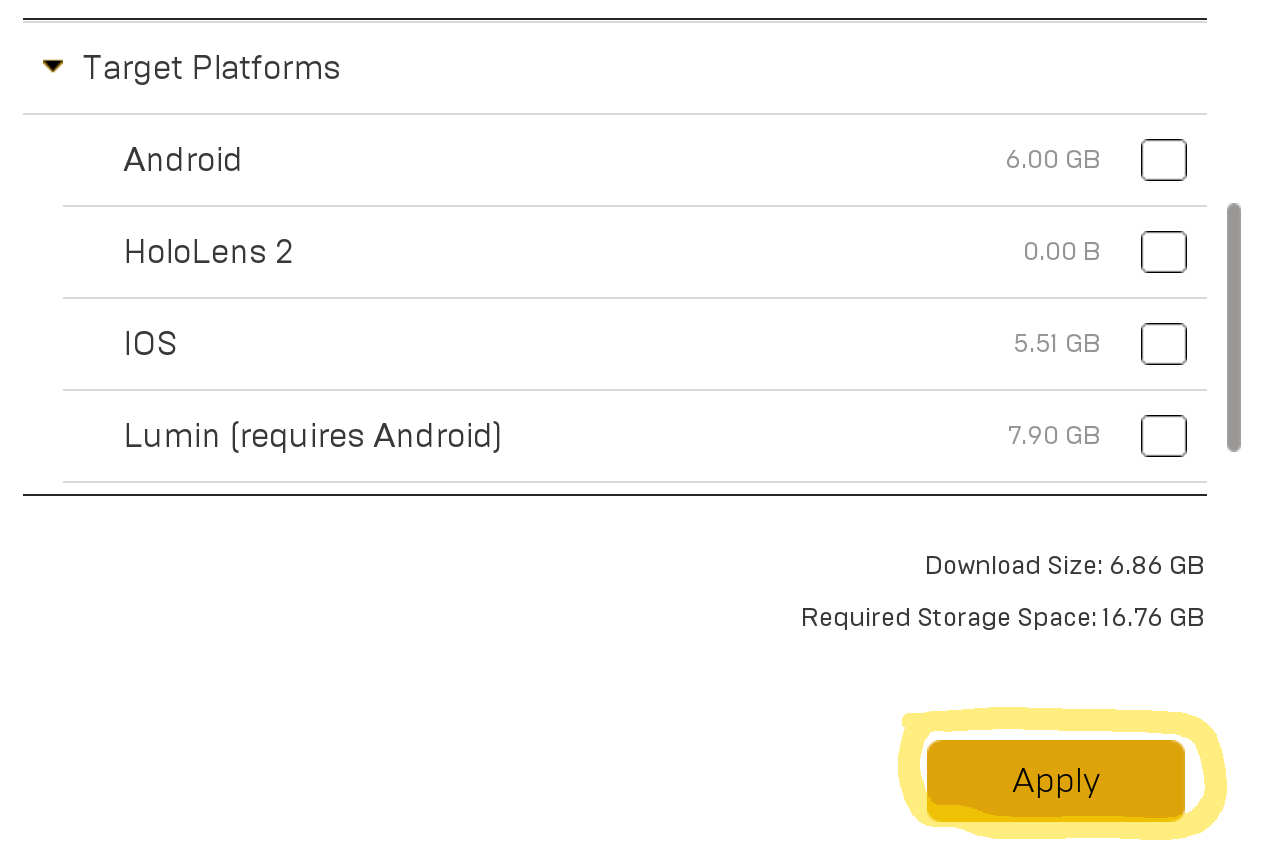
Step 4. Uncheck Android and iOS if you don’t need to build for those platforms.
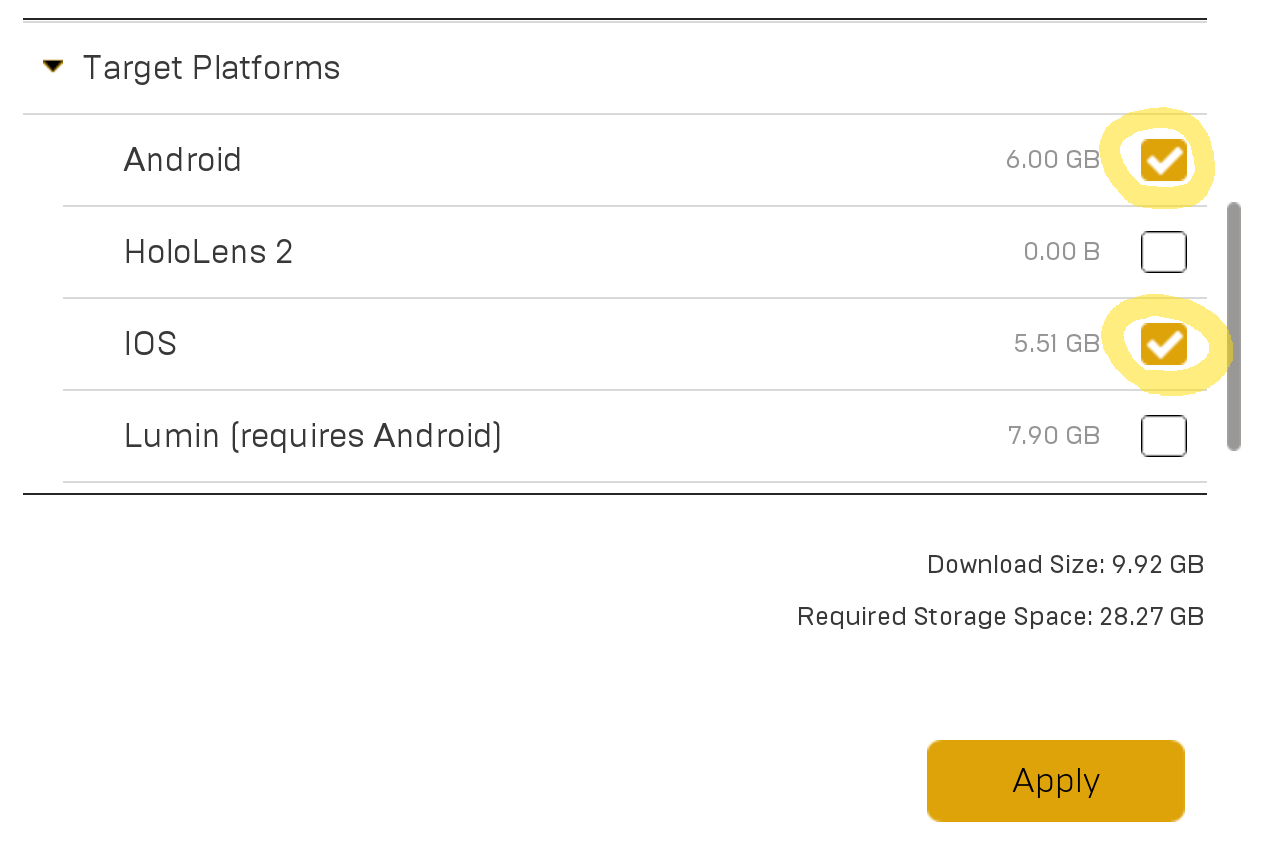
Step 5. You’ve now cut the disk space usage nearly in half.
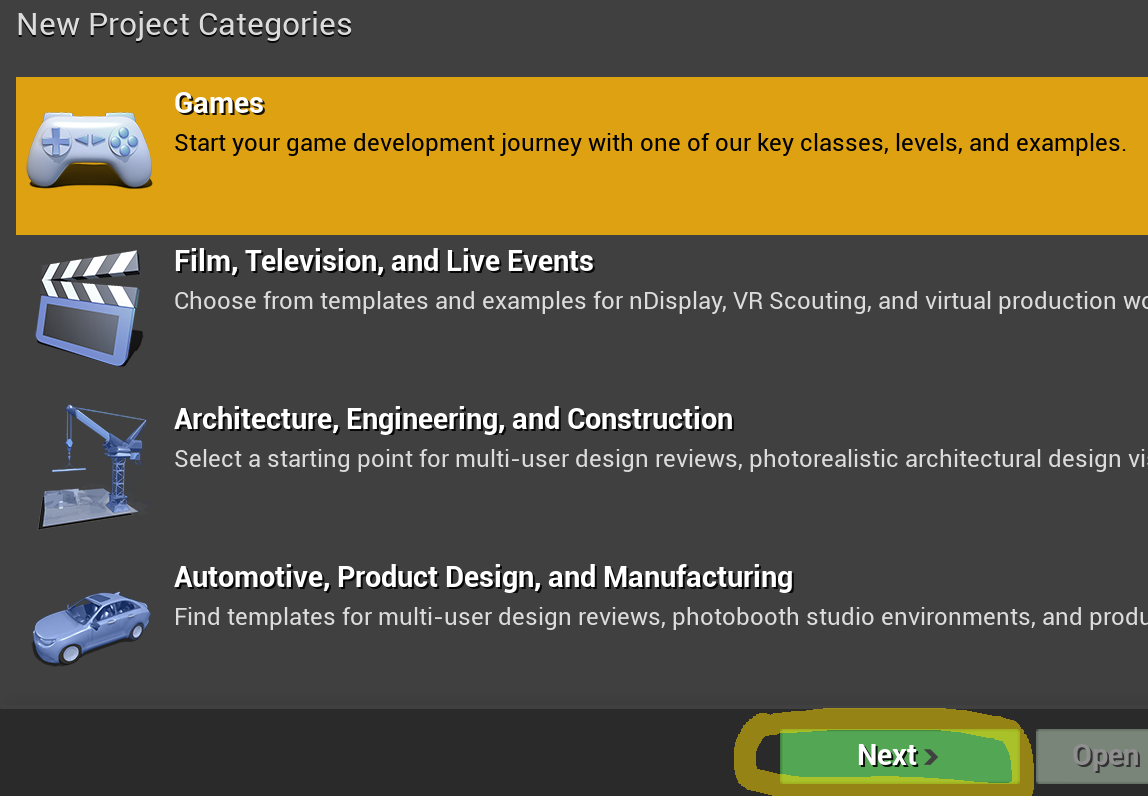
Step 6. Once Unreal is installed, it will start at this New Project Categories screen, which will take you through steps 7–9 one after the other. The project category determines what templates you’ll see—Games is the default category and is fine to start with.
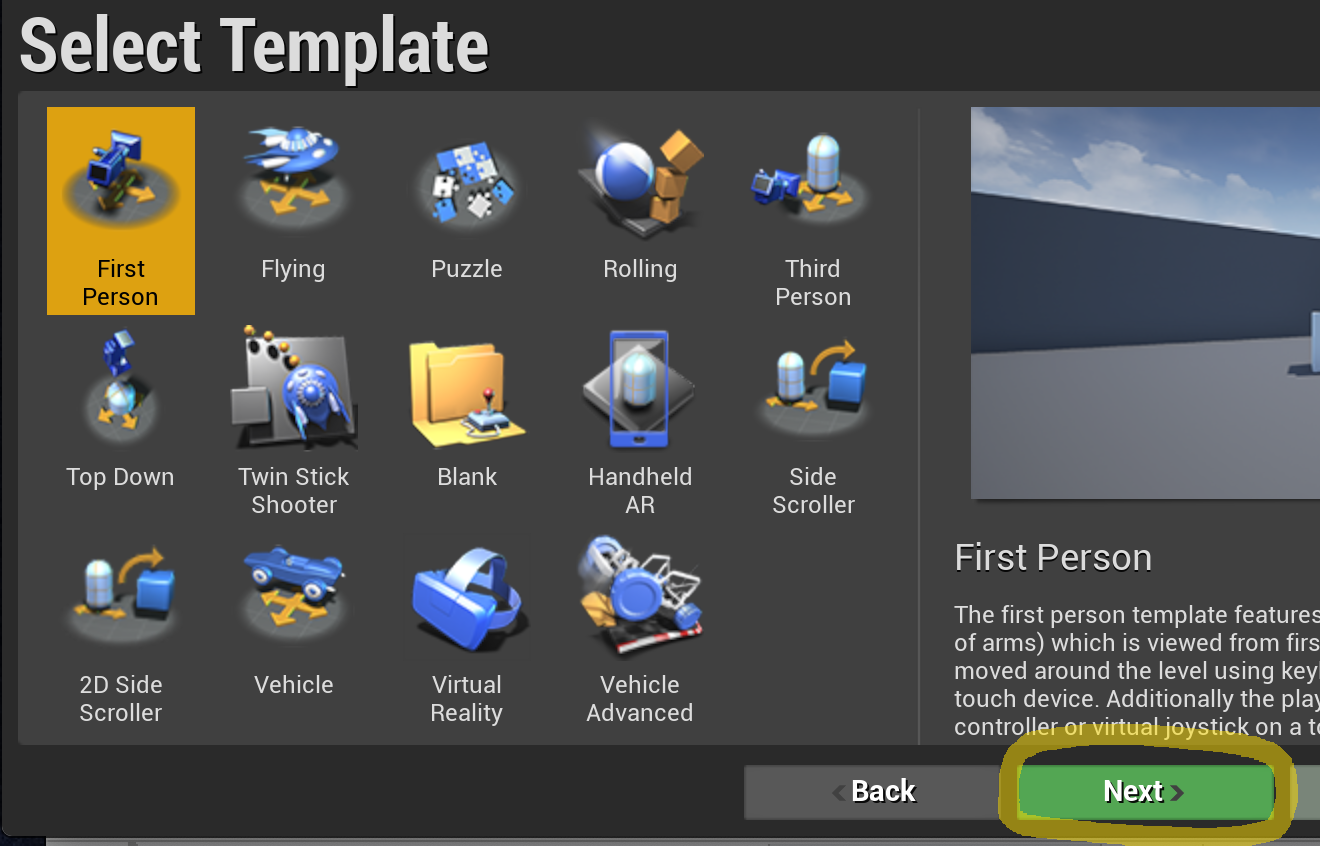
Step 7. Here we’ve chosen a First Person template.
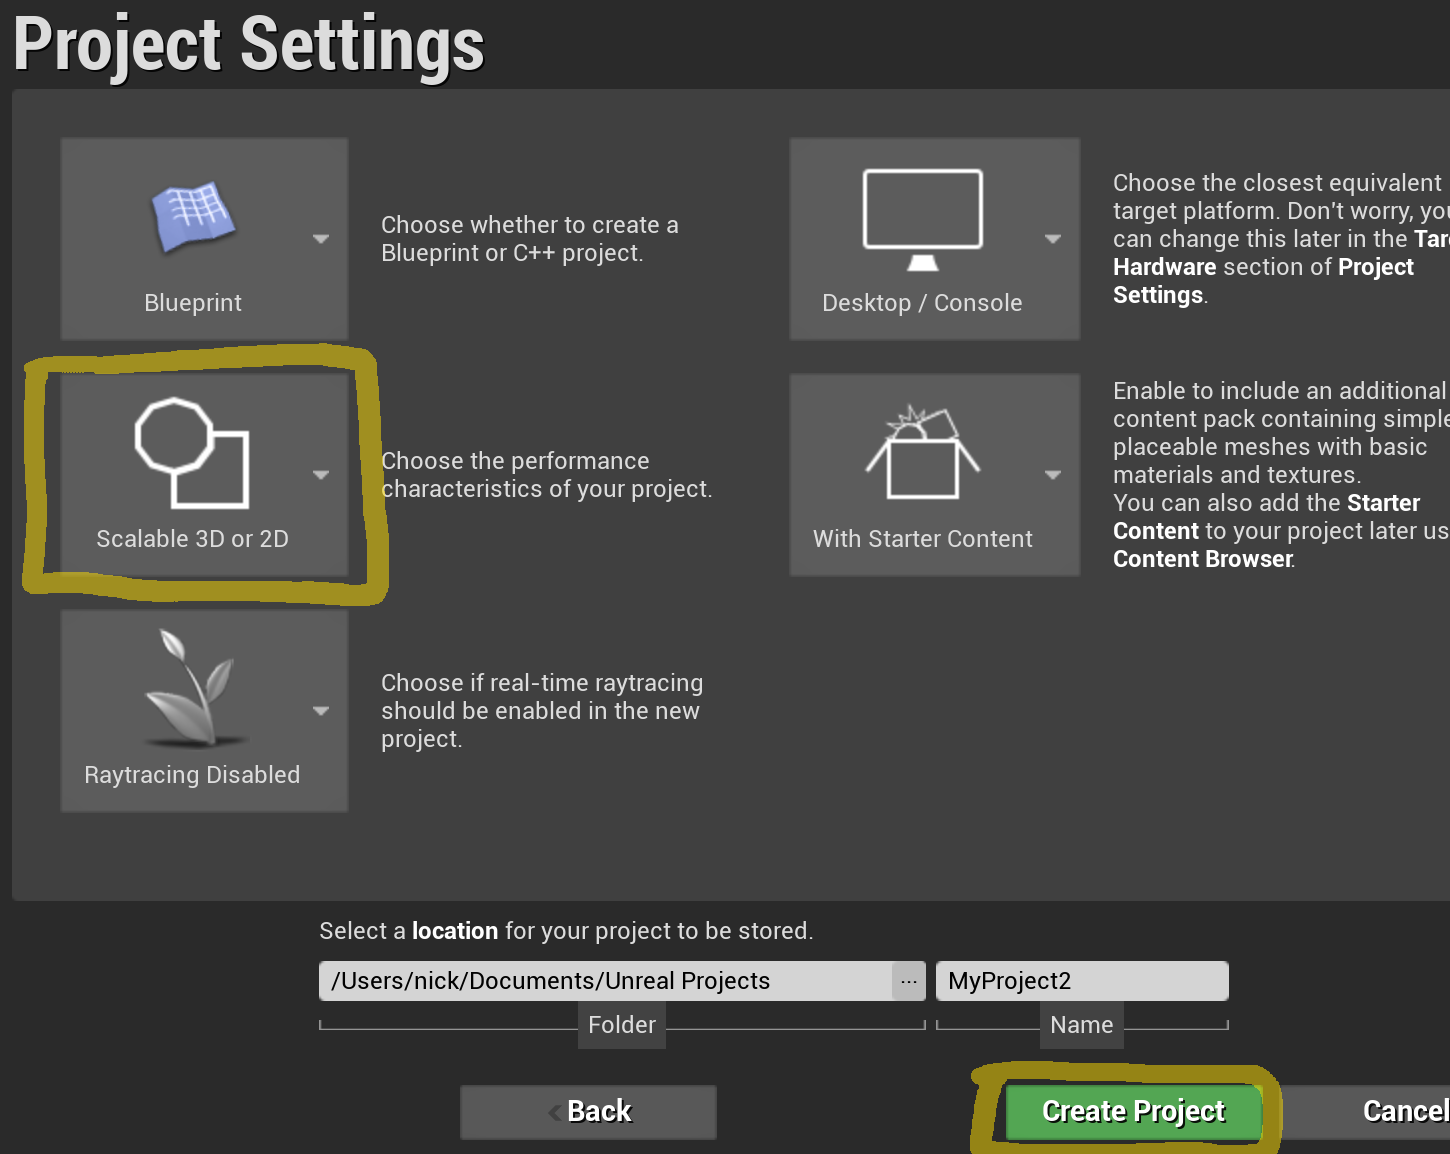
Step 8. Now here comes the important part: in the Project Settings, under Choose the performance characteristics…, choose Scalable 3D or 2D. This is the “low-end” graphics option.
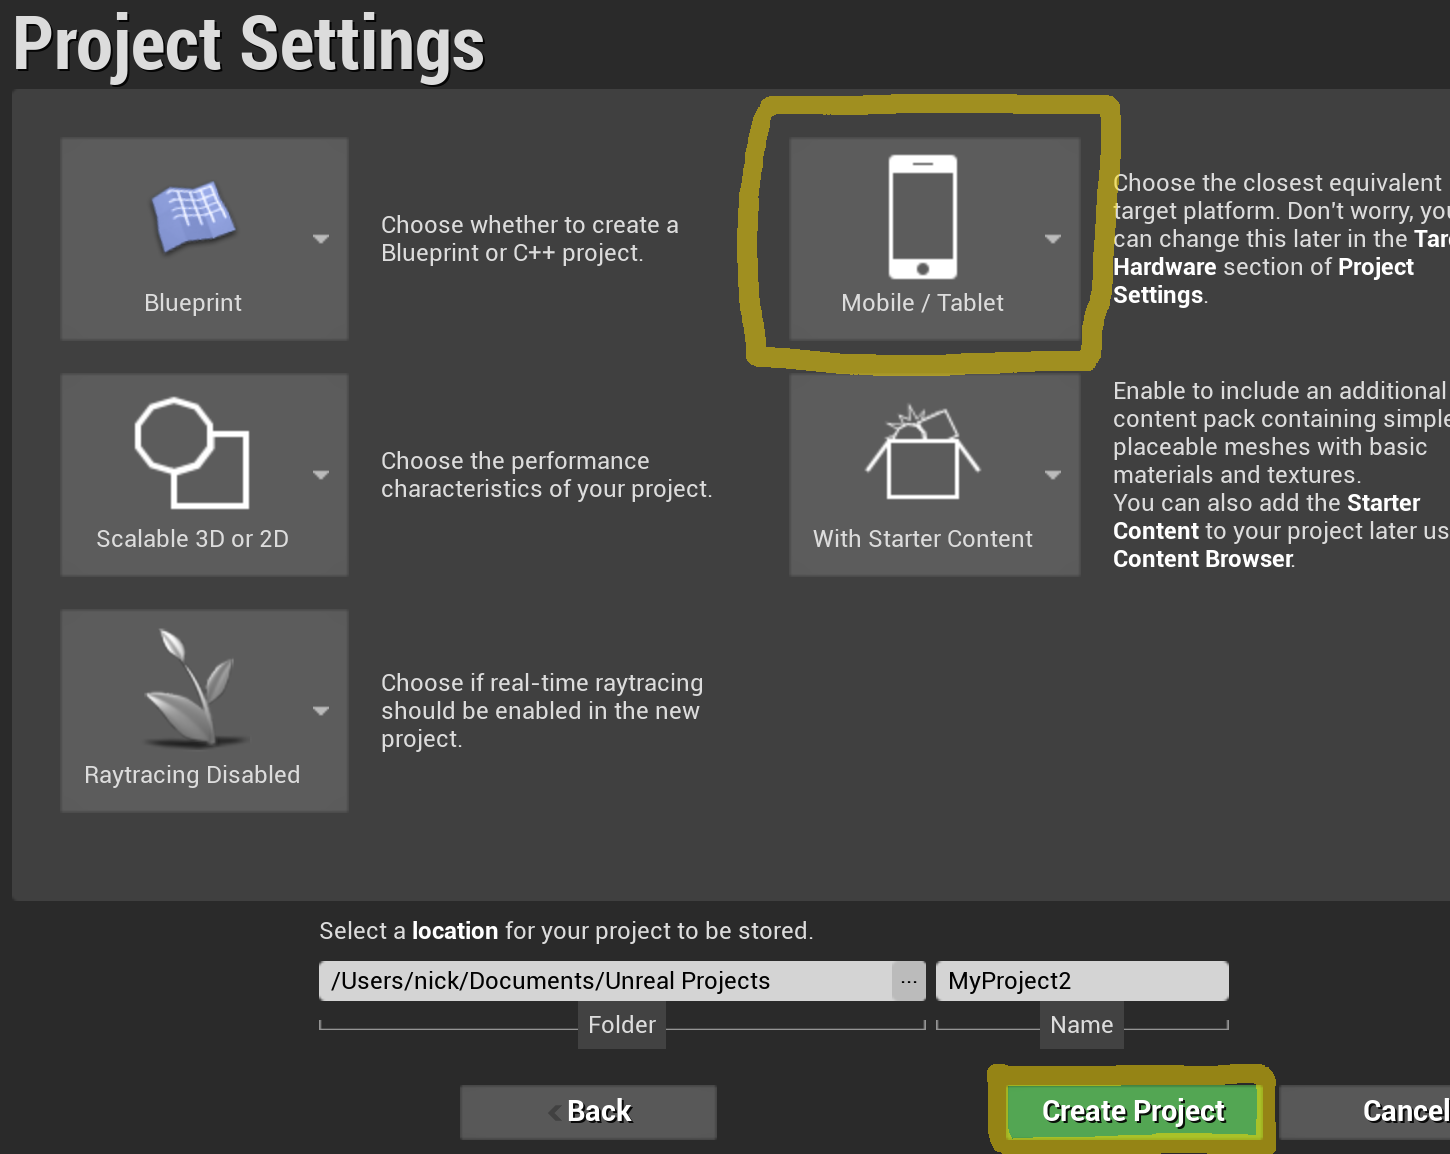
Step 9. For mobile projects, you can quickly gain a further speed boost in the setup process. In the Project Settings, under Choose the closest equivalent target platform…, choose Mobile/Tablet. However, this is not a good idea to do purely for performance’s sake in desktop projects.
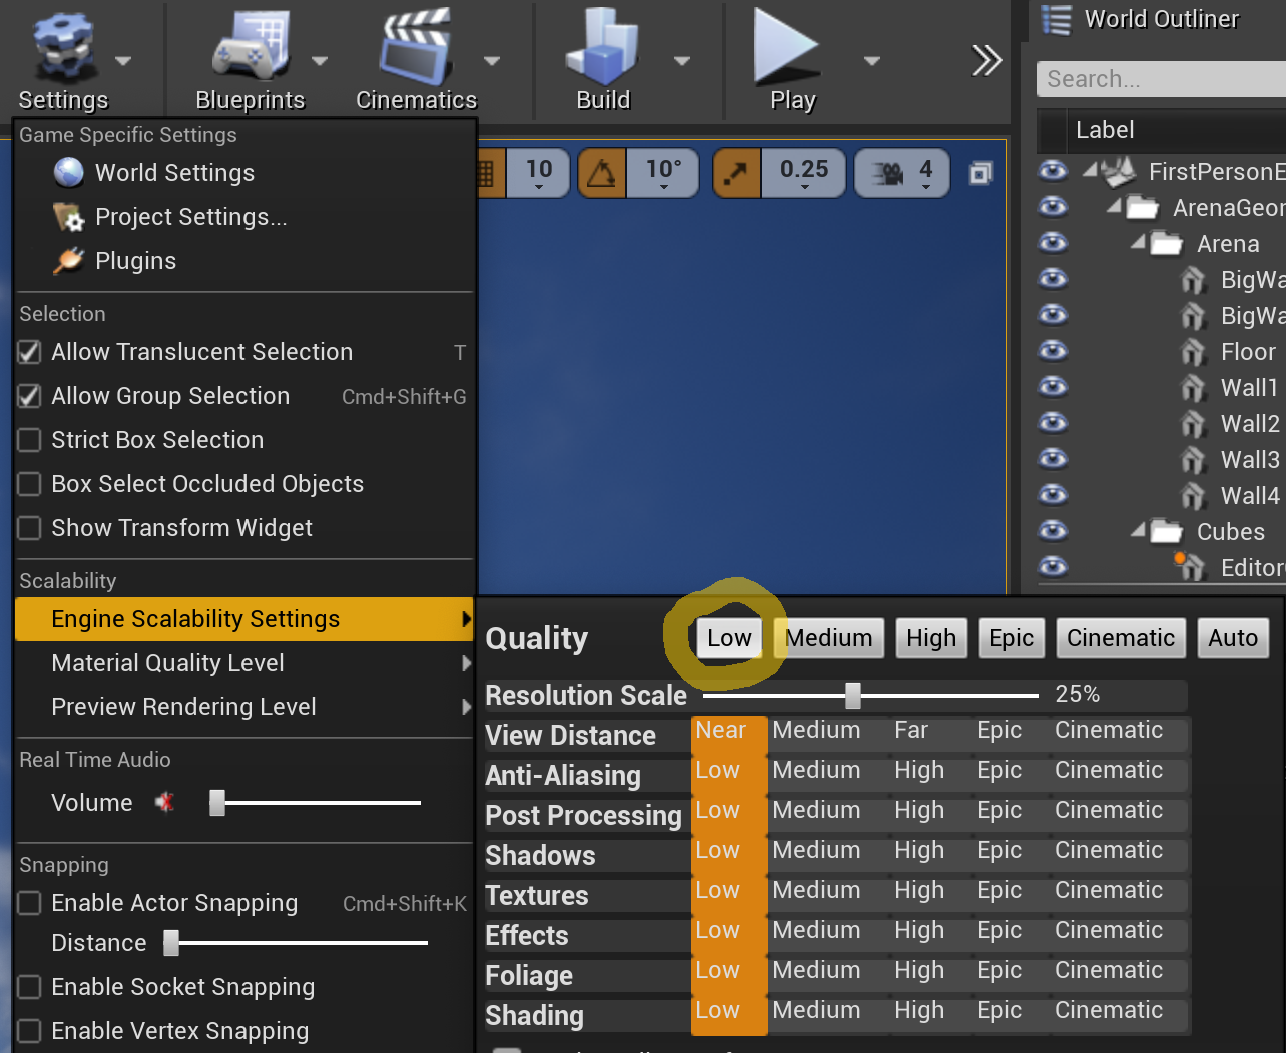
Step 10. If you begin work in your new project and find it’s running too slowly, your next stop is Settings > Engine Scalability Settings. Try dropping the quality to Low or Medium.
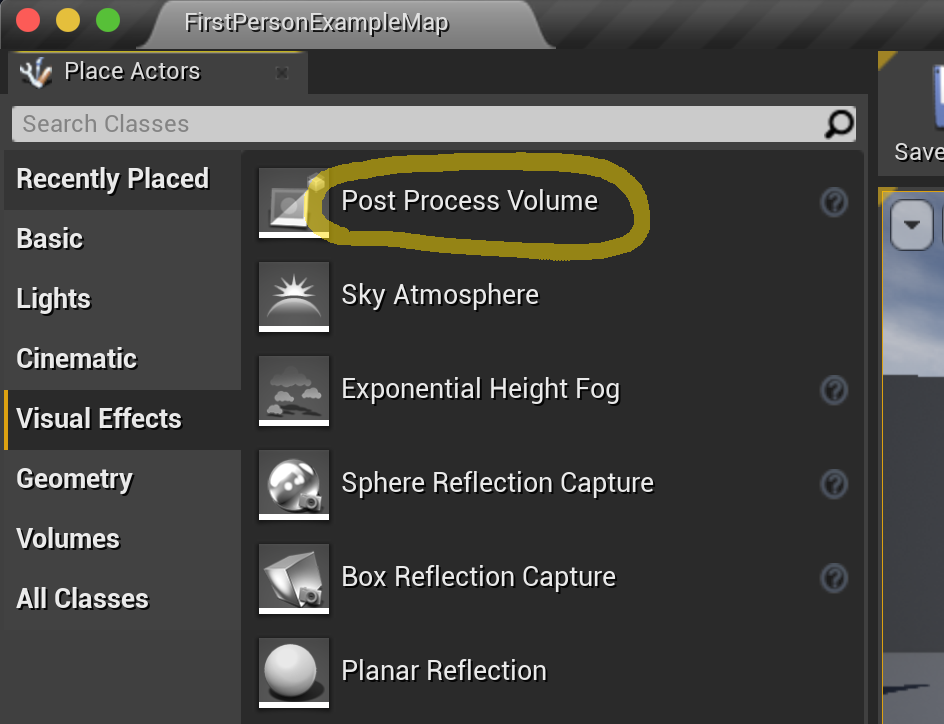
Step 11. As you develop your project, you can explore finer-grained control over the various quality settings. In the Modes pane under Visual Effects you’ll find the Post Process Volume object, which lets you tweak post effects options.
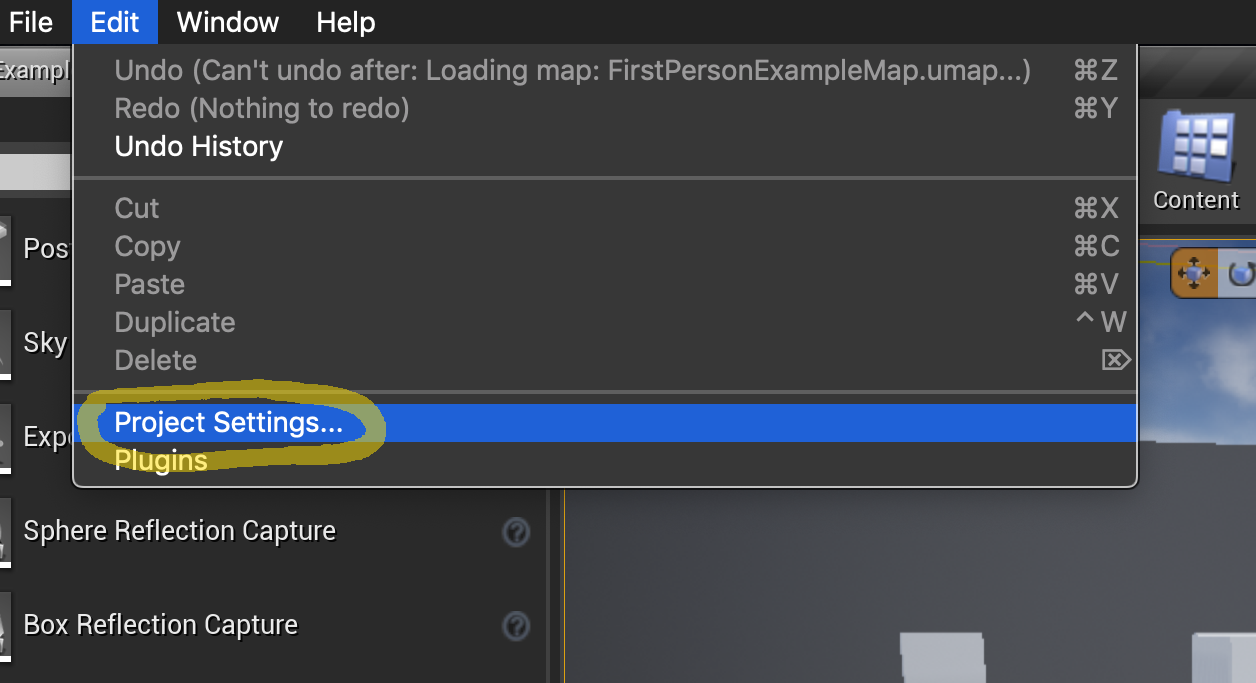
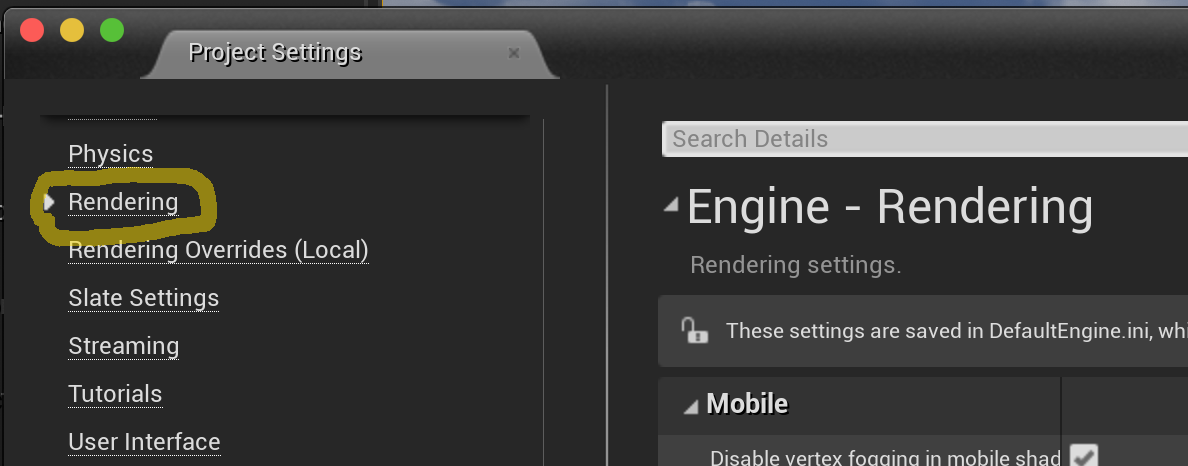
Step 12. Once you begin working more in Unreal, you can go to Edit > Project Settings > Rendering and find all the available rendering settings listed individually.
Basic Boot Camp Setup
Friday October 18th 2019, 4:41 am
Filed under:
WindowsStep 1. Back up your Mac hard drive before proceeding! Boot Camp usually does a good job of not disturbing your existing Mac files, but altering hard disk partitions always carries some risk of erasing all your data.
Step 2. Get a USB stick with nothing important on it. As part of the installation process, the Boot Camp Assistant will find Windows drivers for your hardware and copy them there.
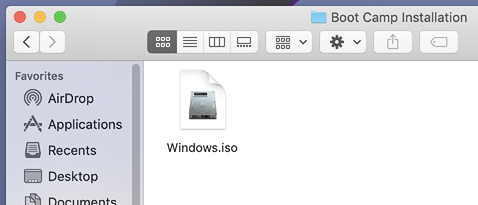
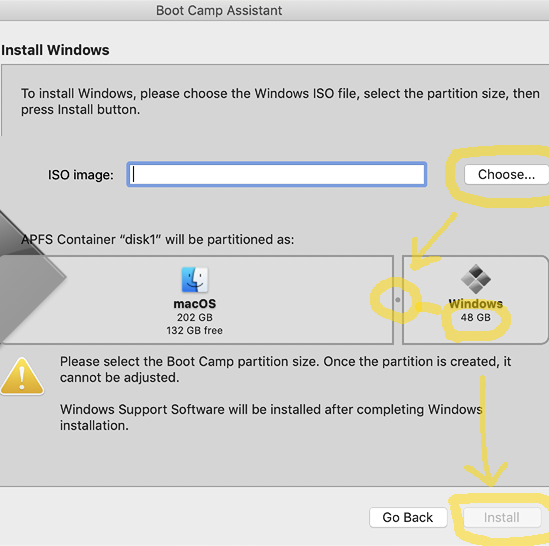
Step 3. Download the Windows 10 install media as an ISO file. (It’s free to download; you can activate it later.)
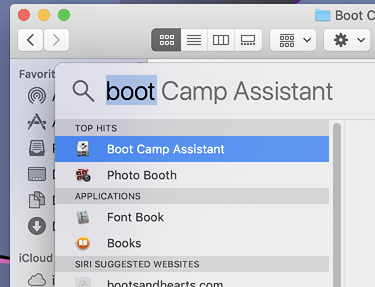
Step 4. Insert your USB stick and run the Boot Camp Assistant.
Step 5. Select the ISO file and choose your partition size. (I recommend no less than 80GB, and ideally 120GB or more.) Click Install to begin the process.
Step 6. Reformat your USB stick if the Boot Camp Assistant asks you to.
Step 7. Reboot the Mac holding down the option key to boot to Windows.
Step 8. Install the Windows hardware drivers that the Boot Camp Assistant copied to the USB stick.
Repair Windows Boot Drive
Wednesday November 01st 2017, 7:59 am
Filed under:
WindowsMess around with Windows partitions enough and you’ll get in a situation where Windows is otherwise undamaged but refuses to boot. Here’s a common fix. (As always, back up your data before touching drive partitions–a single mistake can easily erase everything.)
Step 1. Create a recovery USB drive if you haven’t already.
Step 2. Boot off the recovery drive and go to Advanced Startup Options > Command Prompt.
Step 3. Type:
bootrec /FixMbr
bootrec /FixBoot
bootrec /RebuildBcd
Step 4. Restart and attempt to boot again. If this didn’t work, see here for more helpful terminal repair commands you can try with the recovery drive.
Resize Boot Camp Partition
Monday October 30th 2017, 10:47 am
Filed under:
WindowsAfter creating a Windows Boot Camp partition on a Mac, you might eventually run out of space and want to make it larger. Here’s how to do it without reinstalling Windows. ***Remember to back up first, because a mistake here could erase all data on your machine!***
Step 1. By default, newer versions of OS X have System Integrity Protection, an anti-malware feature that doesn’t let you perform certain modifications to your partitions. Reboot to your Recovery Partition, start the Terminal, and type:
csrutil disable
Step 2. In OS X, shrink the size of your Mac boot partition using the Disk Utility GUI, and reboot.
Step 3. OS X will automatically format the new unused space as HFS+, and we want this space available for Windows, so go to the Terminal and type:
diskutil list
Find the partition you want to erase—probably disk0s4, but double-check that the size is correct—and then type:
sudo diskutil eraseVolume Free\ Space null disk0s4
Step 4. Right now your Windows partition will be temporarily rendered unbootable. To fix it, while still in OS X, download and install the gdisk utility.
Step 5. Type:
sudo gdisk /dev/disk0
Step 6. ***If you get any error messages at this point, stop!*** Otherwise, carefully enter the following (adapted from this forum thread):
r <enter>    go to the recovery & transformation menu

h <enter>    create a new hybrid MBR

5 <enter>    add partion 5 to the MBR

y <enter>    set up EFI boot

<enter>      accept the default MBR hex code of 07

y <enter>    set the bootable flag

n <enter>    do not protects more partitions

o <enter>    review (but don't apply) the changes
Step 7. If this went according to plan, you should see two partitions: one type EE and one 07, with the 07 entry marked with * under Boot. If this is what you see, apply the changes by typing:
w <enter> write partition table to disk
Step 8. Now reboot into Windows and install the free version of Partition Wizard.
Step 9. Click on your Windows partition, click Expand Partition, and choose the unallocated space you erased in Step 3.
Step 10. Click apply and then restart Windows to complete the changes. You should now see the new space added to your Windows partition.
Step 11. Optional final step, reenable OS X SIP. Boot to your Recovery Partition, start the Terminal, and type:
csrutil enable
Step 12. Troubleshooting: If something has gone wrong and Windows is no longer bootable, try these repair steps to recover.
Making Sense of Unity Timeline
Friday September 15th 2017, 6:46 am
Filed under:
UnityI. SETUP
1. Create a new Timeline file in your Project pane.
2. Create an empty GameObject (named, for example, TIMELINE) and select it in the Hierarchy pane.
3. Add a Playable Director component to the TIMELINE object.
4. Drag the Timeline file from your Project pane to the Inspector field of the TIMELINE object.
II. ADDING CLIPS
5. Add an Animator component to each GameObject in your scene you want to control with the Timeline. (You don’t want to add a Playable Director to each GameObject.)
6. In the Timeline pane, add tracks to your Timeline file and give them helpful names. (Don’t try to drag/drop in the Timeline pane, even though that seems intuitive.)
7. Select the TIMELINE object in the Hierarchy and drag each GameObject you want to control to the track in the Inspector, not the Timeline pane.
III. ANIMATING
9. Finally, you’re ready to hit the record button on a track and animate some properties.
10. Save the Timeline file and press Play to see your changes.
11. You can’t edit Timeline track keyframes in the Timeline pane’s keyframe view. Edit them individually in the Animation pane, or select and reposition multiple clips with the Timeline pane’s clip view.
Creative Coding Map 2021
Wednesday August 30th 2017, 12:18 pm
Filed under:
Concepts
Previously: 2017
JavaScript in Max/MSP/Jitter
Saturday April 22nd 2017, 7:56 pm
Filed under:
Realtime
"use strict";

// ~ ~ ~ these variables are built-in ~ ~ ~
inlets = 3;
outlets = 3;
// ~ ~ ~ ~ ~ ~ ~ ~ ~ ~ ~ ~ ~ ~ ~ ~ ~ ~ ~ ~

var nowTime = 0;
var lastTime = 0;
var deltaTime = 0;
var timeCounter = 0;
var timeMax = 10;
var firstRun = true;

// ~ ~ ~ these functions are built-in ~ ~ ~

// this runs when the object is first loaded
function loadbang() {
    init();
}

// this runs each time the object receives a bang
function bang() {
    if (inlet === 0) {
        update();
    } else if (inlet === 2) {
        init();
    }
}

// this runs when the object receives a float message
function msg_float(data) {
    if (inlet === 1) {
        timeMax = data;
        outlet(1, timeMax);
        post("new max: " + timeMax.toFixed(2));
    }
}

// ~ ~ ~ ~ ~ ~ ~ ~ ~ ~ ~ ~ ~ ~ ~ ~ ~ ~ ~ ~

function init() {
    if (firstRun && typeof jsarguments[1] === "number") {
        timeMax = jsarguments[1];
        firstRun = false;
    }
    nowTime = new Date().getTime();
    timeCounter = 0;
    outlet(0, timeCounter);
    outlet(1, timeMax);
    outlet(2, bang);
    post("reset");
}

function update() {
    lastTime = nowTime;
    nowTime = new Date().getTime();
    deltaTime = (nowTime - lastTime) / 1000.0;
    timeCounter += deltaTime;
    if (timeCounter < timeMax) {
        outlet(0, timeCounter);
        post(timeCounter);
    } else {
        init();
    }
}
Blender Keyboard Shortcuts
Sunday November 06th 2016, 10:13 am
Filed under:
BlenderI find the default keyboard shortcuts in Blender very frustrating. Here are a list of changes that I prefer, adapted from Nimble Collective’s excellent video tutorial.
Step 1.
File > User Preferences > Input > …
Step 2.
… Select With: Left
Step 3.
… 3D View:
- Rotate View: Alt-Left Mouse
- Move View: Alt-Middle Mouse / Alt-Cmd-Left Mouse
- Zoom View: Alt-Right Mouse
Step 4.
… View2D:
- Pan View: Alt-Middle Mouse / Alt-Cmd-Left Mouse
- Zoom 2D View: Alt-Right Mouse
Step 5.
… Image > Image (Global):
- View Pan: Alt-Middle Mouse / Alt-Cmd-Left Mouse
- View Zoom: Alt-Right Mouse
Step 6.
… Search Box: [loop select] > Mesh > Loop Select:
Step 7.
File > Save Startup File
MIDI Over a Network (Win)
Friday November 04th 2016, 7:01 am
Filed under:
MidiWindows doesn’t come out of the box with support for MIDI over a network, but you can add it with Tobias Erichsen’s rtpMIDI driver.


