Wednesday June 26th 2013, 9:46 am
Filed under: Video
Using the free utility MPEG Streamclip, you can turn a sequence of image files into a Quicktime movie without any other software:
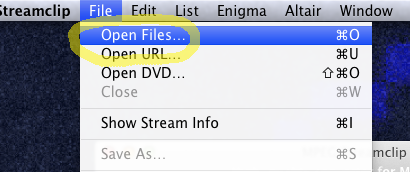
Step 1. Go to Files / Open Files.
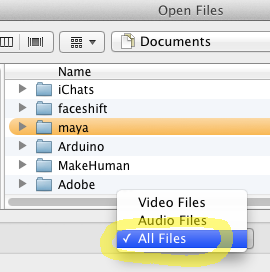
Step 2. From the drop-down menu, choose All Files.
Step 3. Select an image sequence and click Open. (Many image formats are supported; I recommend PNG.)
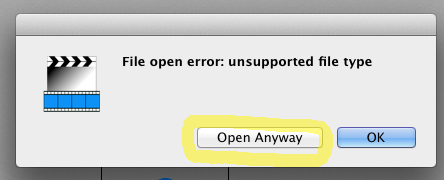
Step 4. You may get a confusing message saying “File open error: unsupported file type.” Just click Open Anyway.
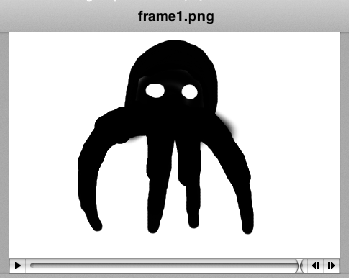
Step 5. At this point you should be able to see your image sequence in the viewer window.
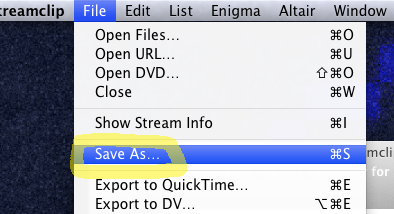
Step 6. Now choose File / Save As.
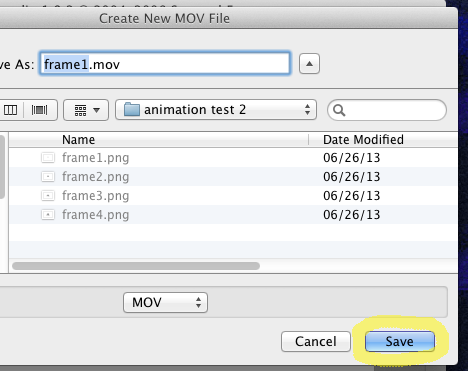
Step 7. Leave the drop-down menu set to MOV, a Quicktime movie file, and click Save. (If you’d like a different video format, I recommend saving out the .mov file and converting it later as a separate step.)
Wednesday April 10th 2013, 9:12 am
Filed under: Video
Terry Hancock’s Lib-Ray initiative is a great alternative to Blu-ray, using high-quality HTML5 video and plain HTML/CSS and JavaScript that can play back online or from an SD card. To support all the major browsers (Firefox, Chrome, and Safari), you need to include WebM versions of your video as well as H.264—but at present the site only offers tutorials for command-line encoding tools, which are challenging for less experienced users. So I’ve created this guide to encoding WebM video using GUI utilities on OS X.
Quicktime 7 Pro (USD $30): creates the video track. This might seem like a strange choice—but in my tests it seems to be the only GUI-based Mac tool right now that can reliably encode high-quality HD WebM video for under $100. For now, other common utilities that claim WebM support are either glitchy or have fixed low-quality settings.
Optional extras:
Audacity (free): A great all-purpose audio editor that can export Vorbis audio files if you’re using separate audio tracks.
MKVToolnix (free): Losslessly add and delete audio and video tracks from a WebM file.
Step 1: Install the audio and video codecs. Drop them into the /Library/Quicktime/ folder, and they should immediately become available.
Step 2: Prepare your materials. Like H.264, WebM is a highly compressed codec, so you’ll need to start with a high-quality original to get good results. I recommend using a Quicktime movie with the PNG, ProRes, DNxHD, or PhotoJPEG codecs. Be aware that WebM doesn’t appear to support nonsquare pixels; for example, you’ll need to convert 720×480 DV video to true 4:3 or 16:9.
Step 3: Open your video in Quicktime Pro and choose Export, then Options.
Step 5: Video settings. Frame rate: You’ll have to manually match your original frame rate. Keyframe every: Your frame rate rounded to the nearest whole number. (If your original video is 23.976 fps, put 24). Data rate: Your choice—be aware this is measured in kilobytes, not bits. I use 3500KB/s for an HD original (approximately Blu-ray bitrate) and 1000KB/s (approximately DVD bitrate) for SD. Quality: I don’t think this affects anything, but I always set it to Best for good luck. One Pass/Two Pass: Two-pass encoding takes more time but gives better results. However, WebM already encodes very slowly, so if it’s not an overnight render you might want to leave this off.
Step 6: Audio settings. Channels: Usually you want Stereo. Rate: 48Khz is standard. Quality: Confusingly, this is sample rate conversion quality, not compression quality. Always choose Best. Encoding quality: 10 is best, on a scale of 1 to 10. (Decrease if file size is important.)
Step 7: HTML5 video lets you specify multiple sources for your video. Here’s some sample code.
You might be asking at this point—why is this odd-duck video format worth all the hassle? Well, it’s about more than just supporting Firefox—WebM was created more from legal necessity than anything else. The very popular H.264 video codec and its main physical-media distribution format, Blu-ray, are caught in a series of conflicts of interest between various giant media and technology companies. (The issues are too complex to summarize easily, but you can read more about them here.)
These fights affect you in numerous subtle ways—licensing squabbles are why, for example, it’s so difficult to play back Blu-ray discs on a computer. H.264’s license terms allow you to give your work away for free, but they don’t let you sell it without paying royalties to the MPEG-LA, the consortium that owns the codec. To be clear, this rule isn’t currently being enforced—it’s very unlikely that anybody plans to stop you selling home-burned Blu-ray copies of your own work—but it leaves the MPEG-LA with far too much control over the livelihood of video producers. And the they could change their license terms at any time. So Google created the WebM video format to have an open-source, (theoretically) patent-unencumbered video codec to fall back on if H.264 became legally impractical to use. (Since YouTube is the world’s largest user of H.264 video, they would be extremely vulnerable to unfavorable licensing changes.) TL;DR—Including WebM as an alternative format protects your right to distribute your own work however you want. It’s an important format to be aware of, especially if you’re an individual artist selling physical copies of your work to collectors or exhibitors,
Thursday January 24th 2013, 3:20 pm
Filed under: Blender
2021 note: this is not necessary for Blender 2.8+.
Blender has a reputation for being difficult to navigate, but you can get around just fine with Mac trackpad gestures—you just need to set things up properly:
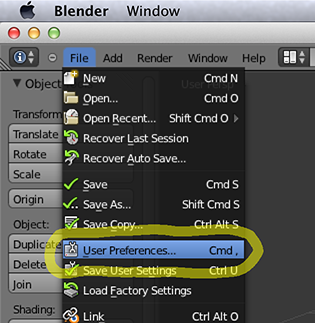
Step 1.
Go to File / User Preferences.
Step 2.
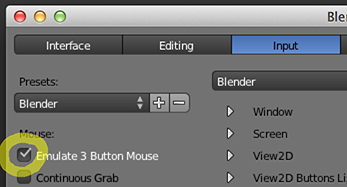
Go to the Input tab.
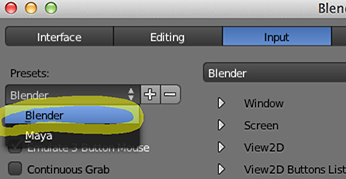
Step 3.
Make sure the Presets drop-down menu is set to Blender. (An option for Maya controls was a nice idea…but it’s Maya’s older control scheme that requires a middle mouse button. So it’s not going to help us.)
Step 4.
Check Emulate 3 Button Mouse.
Step 5.
Choose Save As Default.
Step 6.
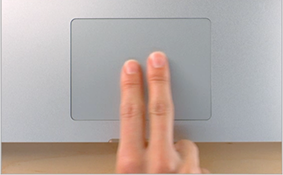
You should now be able to navigate using your trackpad:
Thursday August 30th 2012, 8:27 am
Filed under: Kinect
Victoria Nece and I have released a compiled app and UI panel for getting Kinect mocap data into After Effects—it’s called KinectToPin. For a step-by-step guide, read through this tutorial.
Friday March 23rd 2012, 9:26 am
Filed under: Concepts
(Results from search performed 30 aug 17.)
1. Multimedia (900M results) 1.1. (1960s, fine art): Describes a work that mixes any two or more media; largely replaced in current usage by intermedia. Possibly coined by Bob Goldstein.
1.2. (1990s, computer science): Describes a device that can display multiple types of media—sound, video, text, images, etc.
1.3. (1990s, popular): Describes a work in any medium either created or experienced using such a device; largely replaced in current usage by new media.
2. New media (1990s, media theory, 57M results): Describes works which are both created and experienced using a computer.
3. Mixed media (1950s, fine art, 37M results): Describes a work that mixes two or more visual media, often restricted to the disciplines of painting and sculpture.
4. Intermedia (1960s, fine art, 30M results): Describes a work that mixes any two or more artistic disciplines usually recognized as separate; popularized by the Fluxus group. Coined by Dick Higgins.
5. Hypermedia (1960s, computer science, 4M results): Describes an organized collection of media files that the user can move between at will. Wikipedia is a hypermedia system. Coined by Ted Nelson.
6. Transmedia (1990s, media theory, 4M results): Describes a narrative dispersed across multiple works in multiple media, each of which contains only a portion of the complete story. A long-running franchise like Star Wars can be considered as a single epic transmedia work. Coined by Marsha Kinder.
7. Rich media (2000s, design, 580K results): Describes works distributed via the internet that make use of sound and video, as opposed to images and text; largely replaced in current usage by new media.
Sunday October 30th 2011, 11:31 am
Filed under: Concepts
Monocular
1. Motion parallax: distant things move slower; close things move faster.
2. Depth in motion: something coming closer to you gets bigger.
3. Perspective: parallel lines converge as they move away from you.
4. Familiar size: evaluating the position of an object whose size is known.
5. Relative size: comparing the position of an unknown object to one whose size is known.
6. Color and contrast: all else being equal, reds appear closer than blues, and high-contrast colors appear closer than low-contrast colors.
7. Accommodation: whether the eye is focused on a near or far object, as reported by our eye muscles.
8. Occlusion: an object blocking something else is assumed to be in front of it.
9. Depth of field: blurrier objects are assumed to be further away.
Binocular
10. Stereopsis: the difference between the views of the left and right eye.
11. Convergence: the angle from our eyes to the object viewed, as reported by our eye muscles (for objects closer than ~10m).
Tuesday October 04th 2011, 7:06 pm
Filed under: Concepts
1. Archival master: This is the copy you file away forever, in the highest quality available, and always in an “open” format that you can be reasonably sure will be available decades into the future. (That is, the format’s codec is open-source, or the patent’s expired). The highest-quality formats meeting these requirements can’t even be played back easily, or at all–they’re just for storage.
Recommendations for animation:
picture: 3840×2160 or 1920×1080 @ 12fps, 23.976fps, or 24fps.
sound: 48KHz 24-bit, stereo or discrete 5.1
codecs: EXR image sequence (32bpc), TIFF (16bpc or 8bpc), or PNG image sequence (16bpc or 8bpc); uncompressed AIFF or WAV files.
2. Submaster: This is the copy you make from the master and work with day-to-day. It’s slightly smaller and lower-quality than the master, and might be in a proprietary format that’ll be gone within ten years, but it works great for now. (A high-quality HD video that plays back smoothly on older computers is still a relatively recent invention.) The submaster is also more convenient for creating legacy media like DVD or Blu-ray discs, if you need to.
Recommendations for animation:
picture: 3840×2160 or 1920×1080 @ 23.976fps or 24fps.
sound: 48KHz 24-bit, stereo or discrete 5.1
codecs: Quicktime with Apple ProRes, GoPro Cineform, Avid DNxHR, or PhotoJPEG codec; PCM audio.
2021 note: Quicktime DV was a popular choice for SD master files, but—unlike DVD discs—DV tape hardware never had a widely interoperable standard for 24p video, using hacky workarounds specific to each manufacturer. So if you’re working with some legacy DV material, you’ll need to decode the master correctly, and then transcode to your submaster using a modern codec.
3. Distribution copies: These are the copies you make from the submaster and hand out to your audience. They’re much smaller and lower-quality than the submaster, but can be easily passed around and viewed on many devices.
Recommendations for animation:
picture: 1920×1080@ 23.976fps or 24fps.
sound: 48KHz 16-bit, stereo or 5.1.
codecs: H.264 MP4 video; AAC or AC3 audio.
2021 note: H.264 is currently the established standard for distribution, thanks to its long-standing IP rights squabbles being largely resolved in 2013. Ironically, the same conflicts then ensnared its would-be successor format, H.265, which so far has only served to further entrench standardization on H.264.
Wednesday September 07th 2011, 7:55 am
Filed under: Final Cut
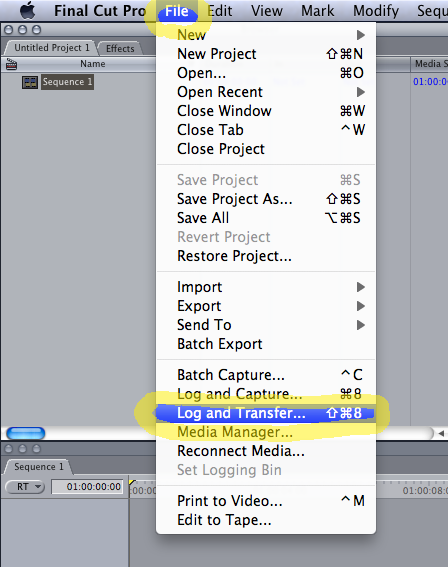
Up through the mid-’00s, we used to capture footage in realtime from tape. If you think about it, “capture” is an exciting and dangerous sort of word which implies you’re getting a hunting party together and it might come back empty-handed. Now we “ingest” footage by copying it in non-realtime (that is, faster than) from memory cards and hard drives…which to me suggests a much more relaxing process, one that happens after a nice meal. However, it’s a bit of an arcane process in Final Cut:
Step 1. Choose File / Log and Transfer.
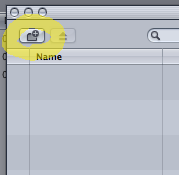
Step 2. Click this obscure icon to import files.
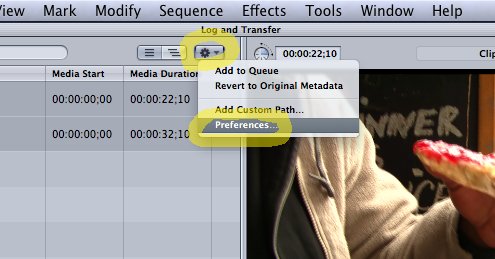
Step 3. Click this other obscure icon to view your Preferences.
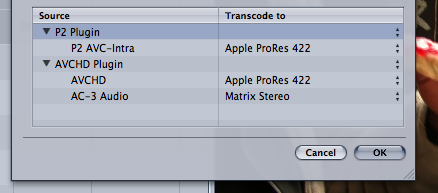
Step 4. Check to see if your camera shoots “24pa” or “24psf” video. If so, you’ll need these extra steps. (Traditional camcorders are more likely than DSLRs to have this issue.) ProRes is a good default choice for your video codec.
Step 5. Select the clips you want to transfer, or else choose Edit / Select all.
Step 6. When you’ve made your selections, choose Add Selection to Queue to begin transferring.
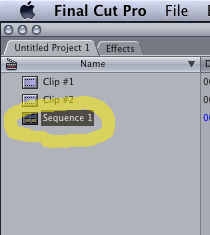
Step 7. Once you’ve transferred your clips, click on your Sequence.
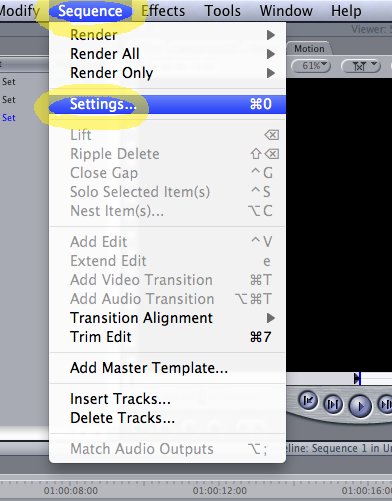
Step 8. Go to Sequence / Settings.
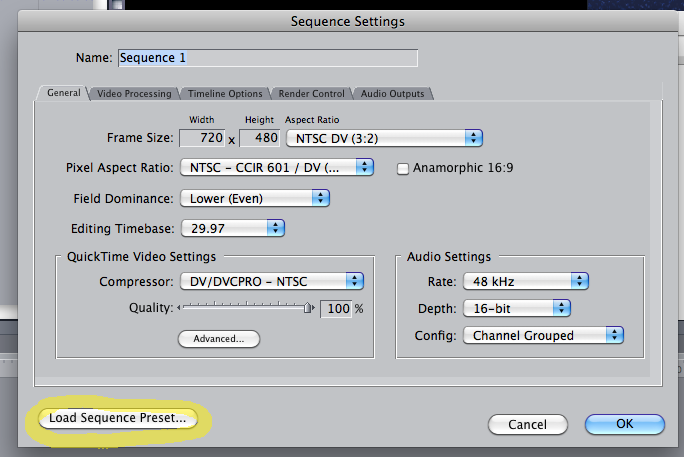
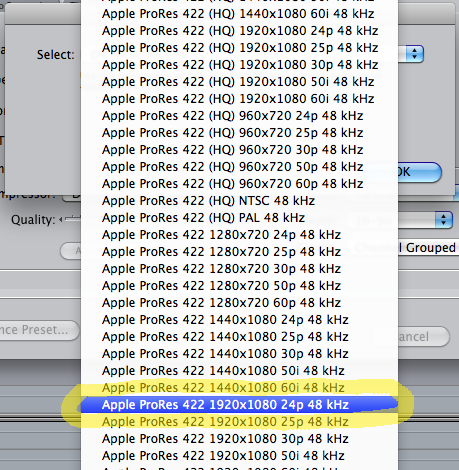
Step 9. The default settings probably won’t be what you want, so click Load Sequence Preset.
Step 10. Most modern cameras in North America will work nicely with Apple ProRes 422 1920×1080 24p 48KHz as your preset.
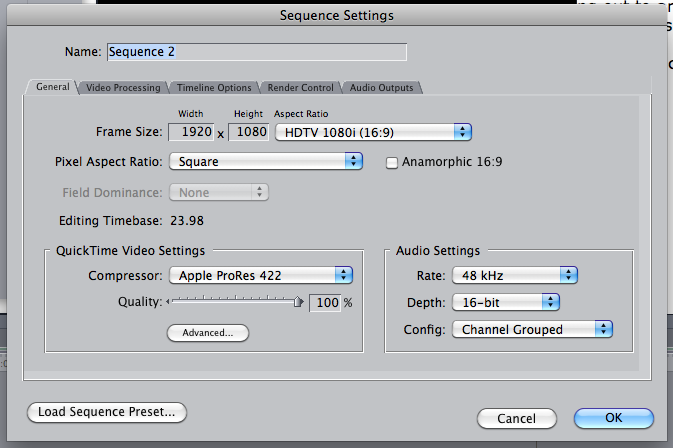
Step 11. After loading the preset, your settings should look like this.
…and you should be ready to edit. Be sure to back up your original video files!
Tuesday August 16th 2011, 12:36 pm
Filed under: OS X
Guessing which of your applications is broken following a major OS upgrade is a familiar ritual for Mac owners. Use these tools to learn what will need to be replaced:
If you’re upgrading to 10.6 Snow Leopard, download and run the SnowChecker utility to check whether you have any incompatible software.