Flash in 60 Seconds
Sunday October 16th 2005, 9:52 pm
Filed under:
FlashFlash and a Wacom tablet make a powerful combination for hand-drawn animation. The academic price of Flash is currently about US$250, and tablets are under $100; add in a free sound-editing program like Audacity, and you have all your essential production needs taken care of. I’ve noticed, though, that most beginning Flash tutorials don’t take advantage of the program’s best feature–its simplicity. After a few setup steps, you can literally just pick up your stylus and go.
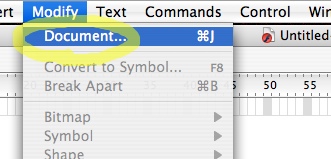
Step 1. The first thing you’ll need to do is choose a size for your document.
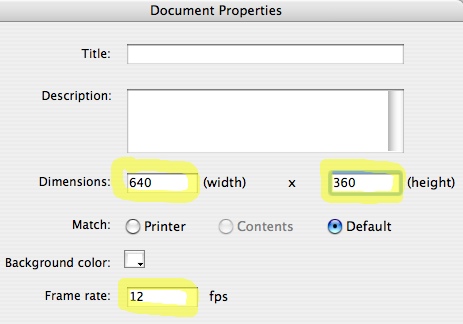
Flash uses vector graphics, so your finished movie can exported at any resolution you like. All you need to worry about right now is the aspect ratio, the width and height of your screen. I’d suggest using 640 x 480 for a 4:3 movie, and 640×360 for a 16:9 movie. You’ll notice that you can choose a frame rate too, although I usually leave that at 12 frames per second.
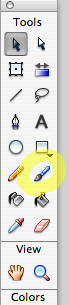
Step 2. Next, pick the Paintbrush tool from the tool palette. Unlike the Pencil tool, it responds to pressure from your tablet, painting thicker strokes the harder you press. (Be sure to click the use tablet pressure button to activate this feature. It’s so useful, I don’t know why it’s not on by default.)

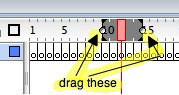
Step 3. Now we get to a slightly tricky bit. You can’t just start drawing into empty spaces on the timeline in Flash. You have to create each blank frame you want to draw into. Fortunately, you can do a bunch at once. Select a group of frames:

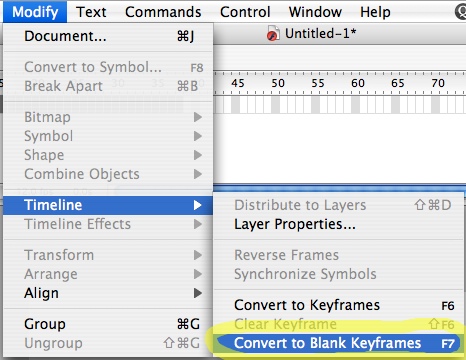
Step 4. Choose the rather well-hidden Convert to Blank Keyframes command from the Modify menu. You’ll notice that it tells you the keystroke for this command is F7. That’s handy to know, because you’ll actually be using this obscure-sounding command a whole lot, to create more frames as you go.
The empty space you selected on your timeline is now filled with blank frames, ready to draw into:

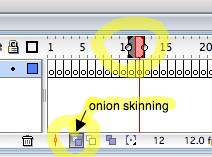
Step 5. There’s one more helpful concept to learn before you get to work. Onion skinning lets you see an overlay of the frames in front of or behind you, so you can keep a previous or future image in mind as you draw. Handily, you can drag the handles of the onion skin viewer to choose how many frames ahead or back you want to see. (I usually just keep one previous frame in view, to use as a reference; otherwise, I start to get confused.) Turn this feature on and off by clicking the onion-skinning button.
Step 6. That’s it for the basics! Once you’re comfortable with the Paintbrush, try experimenting with the other drawing tools.

Undo Quicktime 7
Saturday October 08th 2005, 9:58 pm
Filed under:
OS X / MacOSIn the fall of 2005, I first tried to use Quicktime 7 with OS X Panther (10.3). I ran into subtle but serious problems with sound and video apps. I became convinced that Quicktime 7 is strictly for Tiger (10.4) users.
Apple recognizes that there are issues with QT7 and Panther, and they provide Panther users with a set of uninstall utilities, allowing people who’re unhappy to go back to QT6. The procedure for using them is fairly complicated, and so I pieced this tutorial together after a solid week of investigation, gathering clues from Andy Drabble, Ableton tech support, and a couple of helpful forums at Mac Observer and bannister.org.
Unfortunately, as Quicktime versions change and files are moved around on Apple’s site, this tutorial has to be rewritten fairly frequently. Here’s the latest version, which I hope will be simpler to use. However, unlike any of the previous incarnations, I have not tested it myself–I don’t have Panther any more. People’s feedback so far has been positive, but use at your own risk. You’ll want to update to Panther 10.3.9, and please remember that it’s not for use with any other OS X version. (Just read the comments below–it will almost certainly break a Tiger installation!) So:
Step 1. Here is the original process for getting rid of Quicktime 7.0.1. If you have a version newer than 7.0.1–which you probably do–then skip to the end for instructions on how to downgrade. Once you’re ready to go with 7.0.1, download and run the 7.0.1 to 6.5.2 Reinstaller. Reboot.
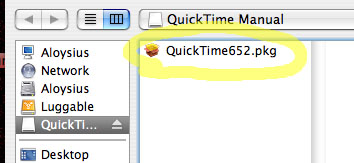
Step 2. Download the original full install of 6.5.2. Open it up, but don’t run it yet.
Step 3. Download and launch CharlesSoft’s Pacifist installer utility. This little lifesaver will clean out the rest of Quicktime 7’s garbage. The normal backup warning applies, though–you’re about to turn a powerful third-party utility loose on the guts of your system.
Step 4. Using Pacifist, open the 6.5.2 installer file.
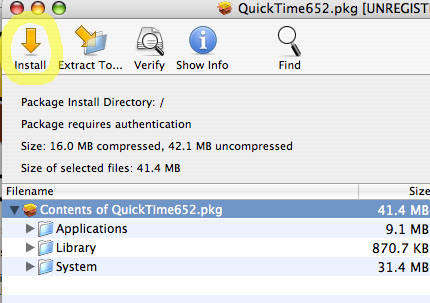
Step 5. Click “Install.” Each time it asks whether you want to “Replace” or “Update,” say Replace.
Step 6. Reboot. You’re done! You should have a healthy Quicktime 6.5.2 system again.
SPECIAL STEPS for Newer Quicktime 7 Users: sorry, but you have four extra steps ahead of you before you can follow the above procedure. You’ll need to perform the Pacifist trick I just described, so I wanted to explain that first.
Extra Step 1. Go to your boot drive, open the Library, and find a folder called Receipts. Delete anything you find named “Quicktime.” Reboot.
Extra Step 2. Download the original full install of 7.0.2. Open it up, but don’t run it yet.
Extra Step 3. Using Pacifist, install 7.0.2 using the special process described above in Step 5. Be sure to say Replace each times it gives you the option. Reboot and check your Quicktime version. Is it 7.0.2? You may need to do this several times before it “takes.”
Extra Step 4. Download and run the 7.0.2 to 7.0.1 Reinstaller. Reboot.
After the four extra steps are complete, you should have downgraded your newer installation into a working installation of 7.0.1. You can now return to Step 1 at the beginning of the tutorial and finish the job.

