

Filed under: Maya
Getting an Autocad file into Maya without special conversion software isn’t impossible, at least for a simple model:
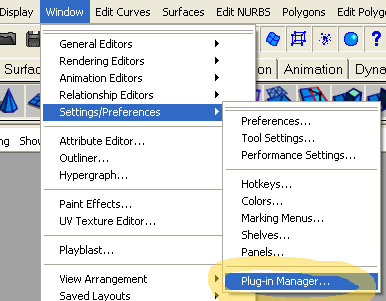
Step 1. Go to the Plug-In Manager.
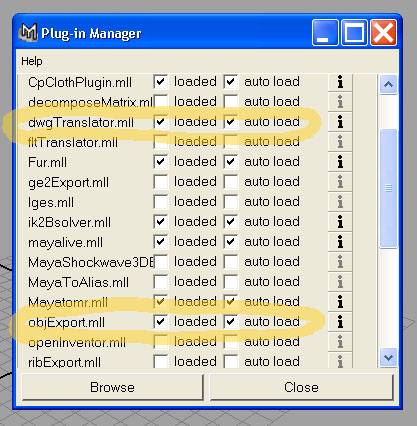
Step 2. Check that dwgTranslator and objExport are turned on.
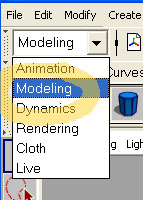
Step 3. Switch Maya into Modeling mode.
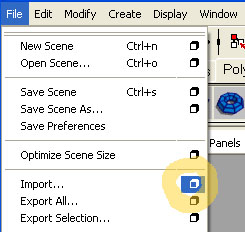
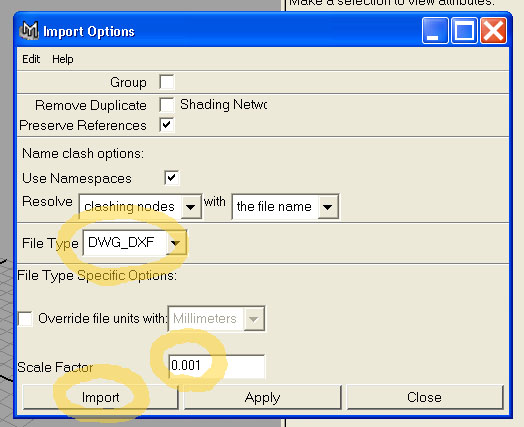
Step 4. Choose the Import option box.
Step 5. Set the File Type to DWG_DXF, and set the Scale Factor to 0.001 (otherwise, Maya will blow your DWG up to an enormous size). Click Import when you’re done.
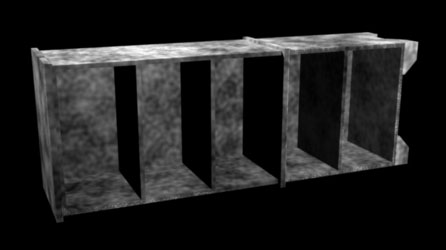
Step 6. Import the file.

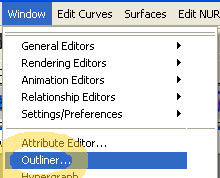
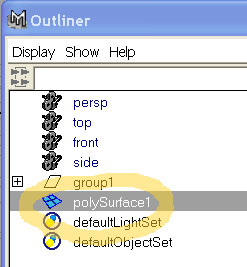
Step 7. Call up the Outliner window.
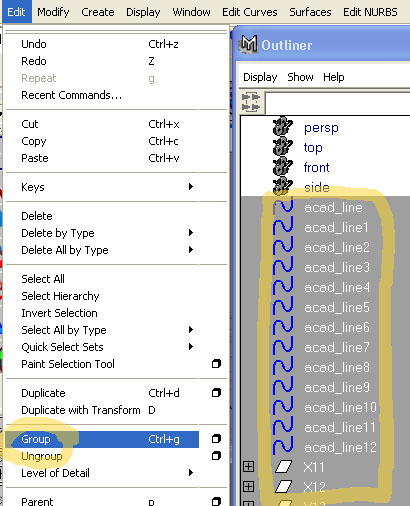
Step 8. DWGs will sometimes arrive in many pieces. Use the Outliner to select all these pieces, and then use the Group command to lump the parts together. (If your file’s parts are already grouped together, you can skip this step.)
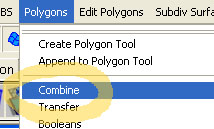
Step 9. With your new group of parts selected, choose Combine from the Polygons menu. This will turn the separate parts into a single object.
Step 10. Make sure your new combined polygon object is selected, or else the next step won’t work.
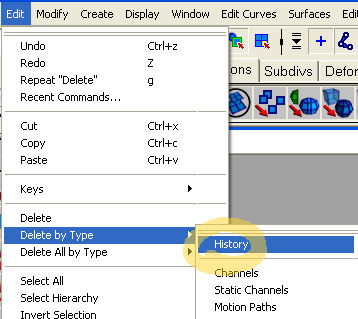
Step 11. Choose Delete By Type/History from the Edit menu. This will break the links between your new object and the old group of imported parts.
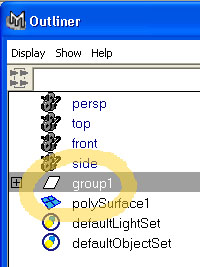
Step 12. Select your old group of parts and delete them. (If your new object suddenly disappears instead, you didn’t delete its History properly.)
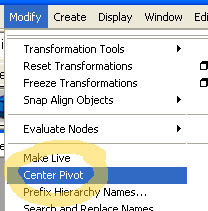
Step 13. The next three steps set up your new object so it works properly in Maya. First, choose Center Pivot from the Modify menu.
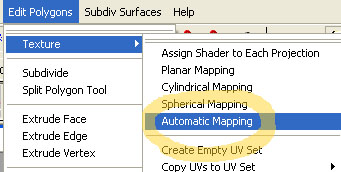
Step 14. Next, choose Texture/Automatic Mapping from the Edit Polygons menu. (You can use any of the commands in the Texture menu to prepare the model for texturing, but I think this is the easiest to start with.)
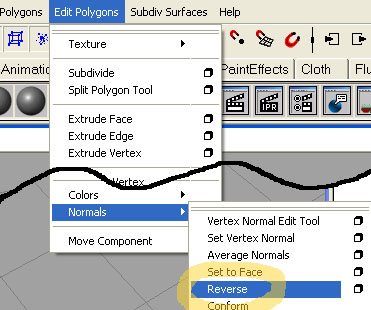
Step 15. Finally, as an optional step, you can choose Normals/Reverse from the Edit Polygons menu if the model appears to be shading strangely.
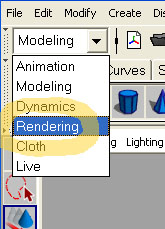
Step 16. That done, you’re ready to texture the model. Switch Maya to Rendering mode.
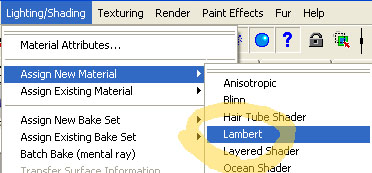
Step 17. Choose Assign New Material from the Lighting/Shading menu. Here, I chose Lambert.
Step 18. Add a texture and check your results–you may need to do some more tweaking before you’re satisfied, but at this point the model should behave normally in Maya.
If you’re still not happy, you might want to try changing your original file’s export settings in Autocad. (I’d recommend avoiding settings that create unnecessary triangles whenever possible.)
2 Things: 1st the .001 scale value was too much and I redid mine at .01 which worked better. Then 2nd, The Step 9: Polygons/Combine did not work. Error: Invalid selection : polyUnite needs at least 2 polygonal objects. //
Makes sense because the curves are imported as Nurb curves.
Thanks, At least I have my CAD drawing in MAYA for me to rebuild
This is absolutely fabulous. I was desperating thinking i had to learn 3ds, that I don’t like at all, to be able to work with autocad. You are my saviour.
Thank you very much!
Comment by Fox Anderson 12.20.06 @ 4:37 amVERY NICE 😀
I was desparate to find out a solution for this! I’ll try it later and then I’ll give you my feedback:)
Thks a lot!!
Comment by Blackangel 03.01.07 @ 6:13 amthank you so much . It help me a lot too. The first post is right. They r nurb curves and break into so many pieces. Mine break into 3000 curves and crash the computer. Need ur help, my life saver. :…..( How to combine them by 1 click.
Comment by maria 12.11.07 @ 10:34 amhttp://wiki.secondlife.com/wiki/Advanced_Sculptie_Exporter_From_Maya
i have this error in maya, i copyed 4 circles, then i selected them (from bottom to up) went to surfaces, Loft and i got tha terror, what can possibly be that error?
Comment by Asonze 03.04.09 @ 11:39 am// Error: Invalid selection. Need at least two curves.
i have this error in maya, i copyed 4 circles, then i selected them (from bottom to up) went to surfaces, Loft and i got tha terror, what can possibly be that error?
Comment by Asonze 03.04.09 @ 11:40 am