Make MP4s with VisualHub
Wednesday January 23rd 2008, 8:22 am
Filed under:
VideoThere are a lot of programs out there for compressing video, but I particularly recommend VisualHub (US$ 25), for OS X.
2012 note: VisualHub is now free, but won’t be supported past OS X Snow Leopard.
I prefer it even over fancier alternatives like Apple’s Compressor, not because of any special capabilities, but because of its clean interface and the straightforward way it presents your compression options. It’s especially useful it you’d like to fit your movie within a given file size–this is a common task, but too many programs require you to get there by trial and error.
(If anyone can recommend a good Windows program with the same ease-of-use factor, please do, and I’ll add a tutorial for it.)
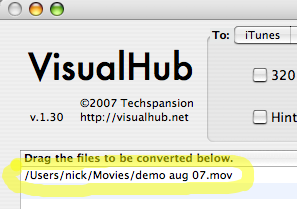
Step 1. Drag your movie into the VisualHub window:
Step 2. Choose the MP4 tab and check H264 Encoding and Hint for Streaming. For very small file sizes, check 320 Pixels Wide too:
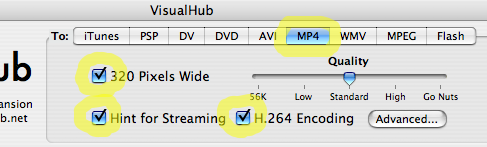
(The H.264 codec gives great results at tiny file sizes. It’s not meant for use in video production, though, so always keep your master copies in DV or another high-quality format.)
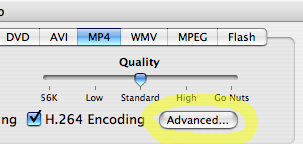
Step 3. If you’d like to specify a target file size, click on Advanced:
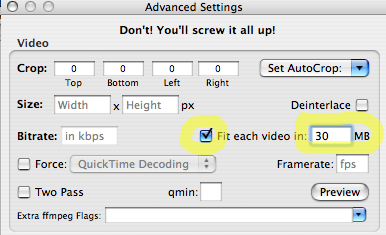
Step 4. Check Fit each video in… and type in a number:
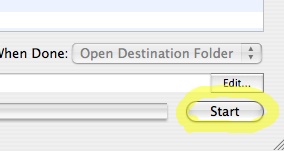
Step 5. Click Start to begin encoding:
Setting up a Final Cut Project
Saturday January 12th 2008, 10:54 am
Filed under:
Final CutA lot of common problems in video editing can be avoided if you make sure you’re using the proper settings each time you create a new project. This is especially important to get right if you’re capturing from or recording to tape–typically, there’s only one combination of settings that will work for any given hardware device.
Settings to watch for include the size of your image in pixels, the number of frames per second, and the type of codec (a set of instructions the computer follows to draw your video on the screen) used. There are also some more arcane details to keep track of, having to do with how your video will display on an analog TV.
Fortunately, modern editing software spares you from memorizing all this stuff; in most cases you can just pick a preset off a list. However, you still have to be vigilant, because the same potential for trouble exists whenever these many variables aren’t all just right. The following advice is for Final Cut, but the principle’s the same for most comparable programs.
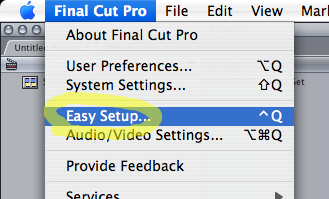
Step 1. The first thing you should do when starting a new project is go to the Easy Setup menu:
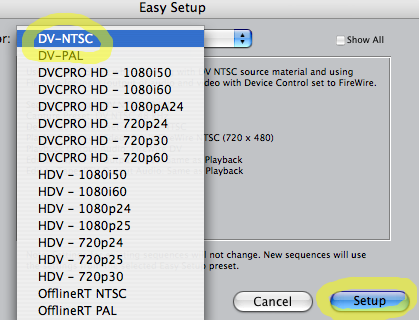
Step 2. Pick your preset off the pop-up list. For North America and parts of Asia, DV-NTSC is a good default choice. (You might need another option on this list; check your camera hardware or ask a friend for help.)
That’s it–all new sequences you create for this project will now conform to the settings you chose. If you’d like to change settings for an existing sequence, you have a few more steps left.
Step 3. Double-click your sequence in the Browser window to open it:

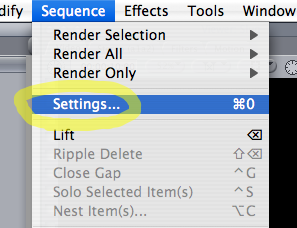
Step 4. Choose Settings from the Sequence menu:
Step 5. Click on Load Sequence Preset:
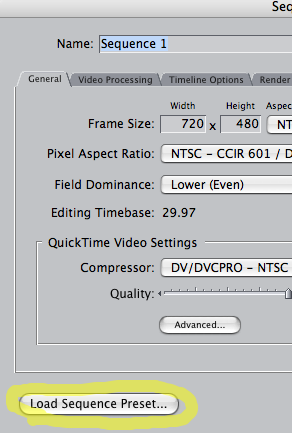
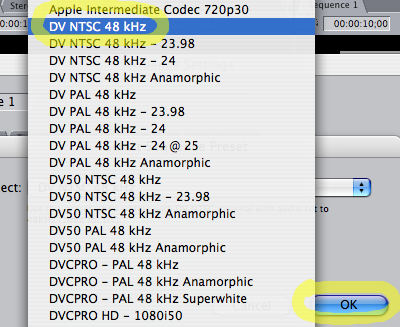
Step 6. You’ll see another list of presets, more extensive than in Easy Setup. Choose the one you need:
Remember, if you’re not sure what settings you need, ask before starting your project! At present, some settings for a Final Cut sequence already in progress can’t be changed. (Timebase, or frame rate, is a particular offender.) This limitation isn’t shared by other editing programs, and I hope it’ll be fixed in a future version of Final Cut.
USB 1 or USB 2?
Tuesday January 01st 2008, 11:48 am
Filed under:
HardwareUSB and Firewire have been in wide use for a decade now, and they’ve done a lot to usher in the modular, multi-purpose modern laptop, which rarely needs to be opened with a screwdriver in the course of normal use. Both come in different flavors, meant to connect different kinds of devices.
You shouldn’t have much trouble telling apart the three kinds of Firewire, because each has a uniquely-shaped jack. USB 1 and USB 2, however, look exactly the same.
USB 1 is much slower, and is meant for undemanding gadgets like mice, keyboards, tablets, and MIDI interfaces. USB 2 is required for everything else, like hard drives, memory sticks, and audio interfaces. Pretty much all computers sold in the past five years come with USB 2, but for older machines you may need to check before buying new equipment. Unhelpfully, the diagnostic screens for both OS X and Windows don’t make this important information easy to decipher.
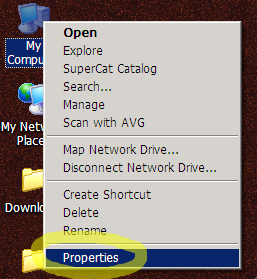
1. For Windows, right-click on the My Computer icon and choose Properties:
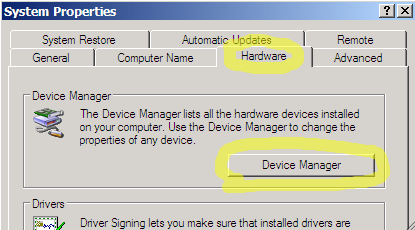
Go to the Hardware tab and choose Device Manager:
Click on the box next to Universal Serial Bus controllers:
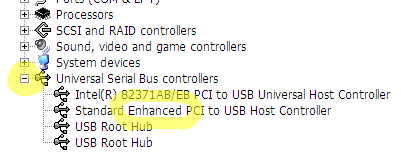
If you see the word Enhanced somewhere in the description of your USB hardware, you have USB 2.
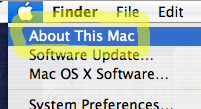
2. For OS X, go to the Apple menu and choose About This Mac:
Click More Info:

Choose USB:
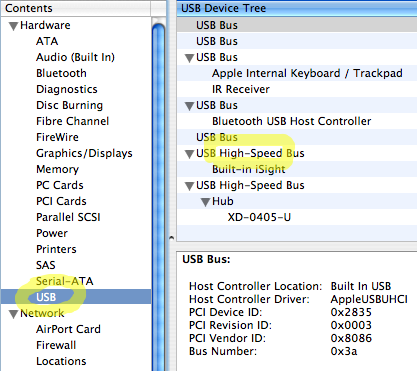
If you see the word High-Speed somewhere in the description of your USB hardware, you have USB 2.
If you don’t have USB 2, you’ll need to buy an add-in card. If you’re looking into this in order to work with video on an external hard drive, you may want to get a Firewire card instead; while not as versatile, it’s better-suited for that particular job. The cost of the cards is comparable, although Firewire hard drives tend to be more expensive.

