Friday November 04th 2016, 6:35 am
Filed under: Midi
Windows doesn’t come set up out of the box for inter-application MIDI, but the capability can be added with a free driver. This guide is for Windows XP and earlier—it’s likely to just crash your DAW on Win10 until you uninstall it.
Step 1. Download the MIDI-Yoke driver. Choose the installer version, not the manual install, so you can easily get rid of it later if you want to.
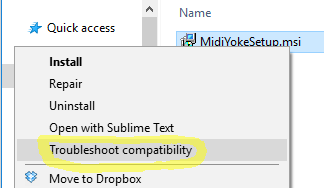
Step 2. Right-click on the installer and choose Troubleshoot compatibility.
Step 3. Click Test the program. Unintuitively, this will actually perform the installation. Step 4. Reboot.
Step 5. Download and install the MidiMapper utility.
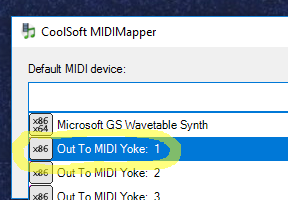
Step 6. Choose a MIDI-Yoke port using the MidiMapper to enable inter-application MIDI.
Friday October 14th 2016, 6:13 am
Filed under: Raspberry Pi
1. Current lineup is:
* $20 for RPi A+ (1 x 700MHz, 256MB RAM)
* $40 for RPi 2B (4 x 900MHz, 1GB RAM).
They both have the same GPU, but the 2B is by far the best value because you can assign the GPU much more RAM. This guide is for a 2B with at least 8GB storage.
2. Basic RPi 2B kit with power supply, case, SD card, wifi dongle, and some cables can be had for $60-70. I used a Canakit. Generally cheaper than acquiring each accessory separately. Good for a fast first-time setup; if you need to, you can invest in better components later.
3. Some useful hardware accessories; a compatility list is maintained at …
* faster SD cards can greatly improve system performance.
* The image quality of the in-house PiCam camera accessory isn’t exceptional, but with a direct bus connection it’ll run faster than third-party USB cameras. It also comes in an infrared version.
* An HDMI dummy dongle fools the OS into thinking a monitor is connected, which can speed things up when running headless and sharing the main display.
4. NOOBS is the boot utility, Raspian is the OS. If your RPi didn’t ship with a preformatted SD card, you’ll need to install it yourself from … Default install settings are fine.
5. The first time you set up, you’ll need a keyboard, mouse, and monitor. (Well, strictly speaking the mouse is optional.)
6. First thing, run sudo rpi-update (firmware) and then sudo apt-get update/upgrade.
7. Then run raspi-config:
* Change the default password
* Enable ssh
* increase GPU memory to 1/4 of total (if working with graphics). You can go higher by editing the config file …
* Change hostname (don’t use an underscore, or you’ll have to fix the hostname by editing the config files … and … )
* Enable camera, if you have one.
8. Wifi will not autostart the first time. Add auto wlan0 to config … now it will try wifi at boot.
9. If you’d like to preload ssids to connect to, enter them into the config file …
10. Reboot and test your network connection and ssh.
11. Install vnc server. Most guides use tightvncserver, which lets multiple users connect to their own desktops but can’t share the main screen. For most cases x11vnc, which shares only the main screen and runs much faster, is a better choice;
12. Add lines … to config … so vnc will run on boot.
13. Reboot and test vnc.
14. To connect headless more easily, you can set a static IP. Or if you have access to your router, you can reserve one for the Pi’s ethernet or wifi MAC address.
15. Right now, no popular RPi VNC viewer will let you view OpenGL graphics–apps will run, but the window will be invisible to you. To work with OpenGL you’ll need a monitor connected.
OPTIONAL
16. Vnc without a firewall is extremely insecure; even if you keep nothing of value on the RPi, it could still be used to attack your network. So install ufw.
17. Before starting ufw, tell it to allow the ports you’ll be using–for example, 22 and 80. (But don’t allow the unencrypted VNC port, usually 5900 or 5901–we want to block that!) You can also tell uwf to allow all ports on a trusted local network.
18. Start ufw. If you get something wrong and lock yourself out, connect a keyboard, mouse, and monitor and check ufw status. If you get stuck you can always disable ufw; it’ll stay off until you enable it again.
19. Reboot and confirm that you’re asked for your user and pass when you start a VNC session over SSH.
20. Reboot once more and confirm that everything’s working. Now you can disconnect your keyboard, mouse, and monitor and run your RPi headless.
21. Hard part’s over. Next, add some software tools, for example:
* Btsync
* Gphoto
* ffmpeg
* VLC
* imagemagick
* PureData
22. Finally, set up dev environments for your favorite programming languages. The RPi comes with Python, but here are some more options:
Friday October 14th 2016, 6:11 am
Filed under: Windows
I. Prepare the New Disk
1. Connect your new disk as a secondary disk.
2. In DiskManager, create a 200MB hidden NTFS partition (no drive letter) on your new disk.
3. Right-click the hidden partition and mark it Active.
4. Then create a regular NTFS partition (with drive letter) filling the rest of the space.
II. Clone Old Disk to New
5. Install DriveImage XML and choose Drive to Drive or Restore and clone your disk. Ignore warnings.
III. Make the New Disk Bootable
6. Follow these instructions to create a Windows recovery usb and use it to make the new drive bootable.
IV. Cleanup
11. Scan your new boot disk for errors.
12. If the cloned disk complains about not having a genuine version of Windows, open a prompt as Administrator and type:
SLMGR -REARM
Tuesday September 22nd 2015, 12:06 pm
Filed under: Concepts
POST-PROCESSING BASED
1. FXAA (Fast Approximate): Post-processes the final rasterized image to smooth edges. Very fast but poor quality, adding blurriness. Aka MLAA (Morphological).
2. SMAA (Subpixel Morphological): Like FXAA, but compares across multiple frames. Substantially reduces blurriness at a modest performance cost.
SUPER-SAMPLING BASED
3. SSAA (Super-Sample): Renders the scene at a larger resolution and downsamples. High-quality with no artifacts, but extremely slow. Aka FSAA (Full Screen).
4. MSAA (Multi-Sample): Detects the edges of geometry, renders only those areas at a higher resolution, then downsamples. Good balance between speed and quality but sometimes has inconsistencies between frames; hardware support can be limited. Aka EQAA (Enhanced Quality), CSAA (Coverage Sample).
5. TXAA (Temporal): Like MSAA, but compares the edges of geometry across multiple frames, delivering greatly improved quality with comparable performance. However, currently has extremely limited hardware support.
Sunday February 08th 2015, 11:40 am
Filed under: Kinect
The Kinect 2 is supposed to have superior skeleton tracking, so I tested it against the Kinect 1 in a single-camera setup of iPi Studio.
Conclusion: a single camera is always going to have trouble when the actor doesn’t face front, so both tests show obvious glitches. However the Kinect 2 does seem to capture more subtle movements.
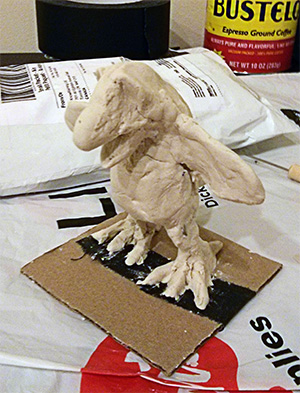
Step 1. Build a model with armature wire and air-drying clay.
Step 2. Place the model on a coffee can or similar, mount your camera or scanning device on a tripod, and slowly rotate the can as you scan. These 2014 photos show a PrimeSense Carmine 1.09 depth camera, Skanect scanning software running on a Mac, and a can of Café Bustelo. Good 2024 substitutes for the first two elements include a lidar iOS device with the Polycam app, an Azure Kinect and Kinfu, or a conventional camera with any photogrammetry software, for example Meshroom).
Friday January 10th 2014, 11:45 pm
Filed under: Windows
In earlier Windowses, if you pressed F8 at boot time, you’d go to a special “Safe Mode,” which was very useful for repairing a damaged install that otherwise wouldn’t boot. Safe Mode still exists in Windows 8, but it’s disabled by default. To enable it:
Step 1. Run a Command Prompt as Administrator.
Step 2.Type:
bcdedit /set {default} bootmenupolicy legacy
That’s it! Pressing F8 at boot should now bring up the traditional Safe Mode menu.
Friday January 10th 2014, 8:13 pm
Filed under: Windows
The new tile interface in Windows 8 has its fans, but if you don’t like it then it’s possible to completely get rid of it as of Windows 8.1.
Part I: Upgrading Windows 8.0 to 8.1
Step 1. Go to the Windows Store in the tile menu; a Windows 8.1 upgrade tile should appear.
Step 2. If the tile doesn’t appear, install this update.
Step 3. Return to the Store in the tile menu and install the Win 8.1 upgrade.
Part II: Once you’re running Windows 8.1
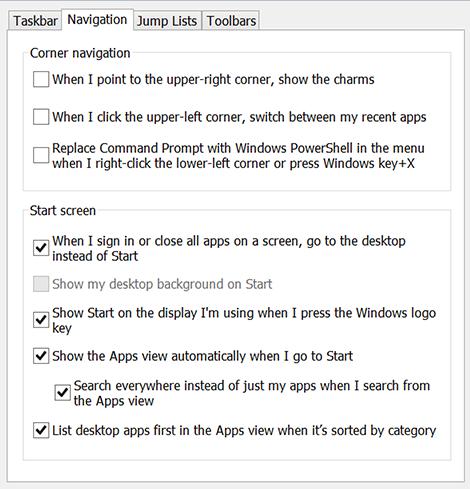
Step 1. Right-click on the taskbar and choose Properties > Navigation.
Step 2. To enable booting to desktop, uncheck everything in the top pane and check everything in the bottom pane:
Step 3. Next, to restore the traditional Start Menu, install the Classic Shell utility.
Step 4. Right-click the Start Button and choose Settings. In the Start Menu Settings tab, click Aero and Windows 7 style to get the familiar Win7 layout. Or customize to taste.
Step 5. If the Start Button shows the Classic Shell logo, uncheck Replace Start Button to return to the regular Windows logo.
Tuesday October 08th 2013, 9:22 am
Filed under: Kinect
This will be expanded soon. In the meantime—can you edit the camera position of an RGBD Toolkit sequence in Maya?
1. You have a virtual camera in Maya that you can place however you want, so the simple answer is: yes.
2. However! If you shot the RGBD scene with a real-life moving camera, then your material has real-life camera movement permanently baked into it. If you want to work in Maya and freely reposition a virtual camera, best to shoot the real-life scene on a tripod.
3. Unless! You want to be really clever and use match-move software (Maya and After Effects both come with trackers) to track the calibrated RGB video from the DSLR camera. (Kinect depth images are useless for that kind of tracking; way too weird-looking for match-move software to understand.) You could then create a virtual camera in Maya that matches the real-life camera you shot the scene with. Then anything you animate in Maya moves in sync with your original recording. (You’re still stuck with the original real-life camera move, however–remember that’s always permanently baked into the RGBD data.)