Inter-Application MIDI (OS X)
Tuesday June 26th 2007, 10:57 am
Filed under:
MidiOS X has a neat built-in feature that lets two MIDI programs on the same machine talk to each other, making all kinds of interesting projects possible. It’s called the IAC Driver.
Note: For Windows XP and newer (Windows 10, etc.): LoopBe1 is a free third-party driver that does the same thing. Or, for Windows XP and earlier (Windows 2000, etc.): use MIDI Yoke.
Back to OS X—
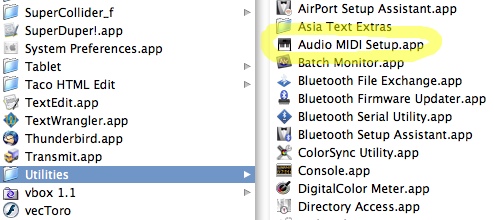
Step 1. Find and launch the Audio MIDI Setup utility:
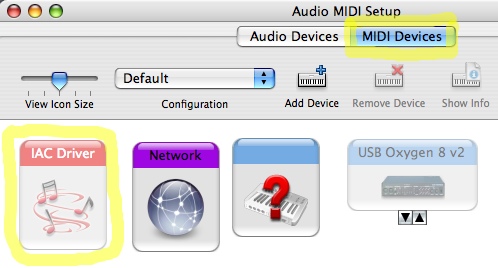
Step 2. Go to MIDI Devices and find the IAC Driver’s icon. If you’ve never used it before, it’ll be grayed out:
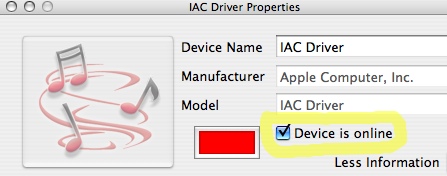
Step 3. Turn it on by checking the Device is online box:
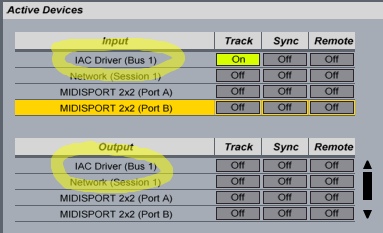
Step 4. Now you can go to the MIDI preferences of any program you like and treat the IAC Driver as a MIDI input or output:
How to FTP
Saturday February 03rd 2007, 4:31 am
Filed under:
InternetFTP (File Transfer Protocol) is a way to send large files over a network from one computer to another. This tutorial uses FireFTP, an excellent addon for the Firefox browser. (If Firefox is already your regular browser, you won’t even have to leave it to send files by FTP.)
If you don’t want to use Firefox, you can also use the cross-platform FileZilla FTP client; the setup steps are nearly identical to the tutorial below. (If you’re on a Mac and use FTP frequently, I highly recommend Transmit, USD $34.)
Before proceeding, get the following pieces of information from your server administrator:
* The address of your server–usually, although not always, the same as the ordinary web address.
* Your username and password to log in.
* The directory you should put files in to make them visible on the web. (Putting files somewhere else can make them visible only to FTP programs, not to browsers.)
And now you’re ready to send a file:
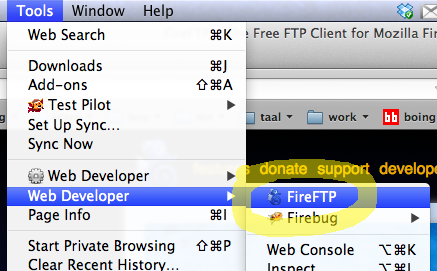
Step 1. Start the Firefox browser and launch FireFTP from the Tools menu.
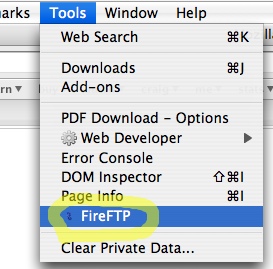
Update: Newer versions of Firefox may hide FireFTP in a submenu called Web Developer:
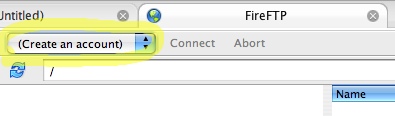
Step 2. Click Create an account.
Step 3. Give your new account a name and enter the information mentioned above.

Step 4. Click Connect.

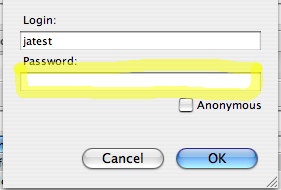
Step 5. Each time you connect, you’ll be asked for your password.
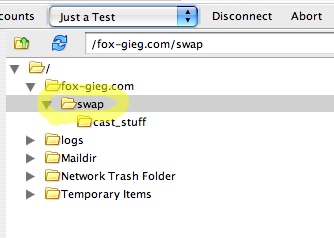
Step 6. You should now be able to see the directories available on your server. Choose where you would like to send your file.
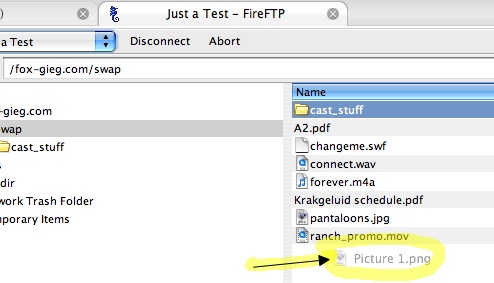
Step 8. Drag and drop your file to send it.
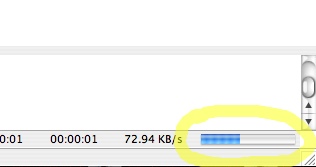
Step 9. Watch the progress bar in the lower left-hand corner as your file uploads.
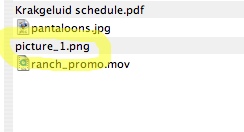
Step 10. Once your file is uploaded, you can rename or delete it by right-clicking on it.

Step 11. While FTP programs generally have no restrictions on what you can name your file, remember that, to make it properly accessible on the web, you should use no spaces or uppercase letters.
Step 12. If you uploaded your file into a web directory, type the address into your browser and see if the link works!

Now, this is a somewhat involved process for a beginner. There are lots of other ways for people to exchange files, so why should you bother with FTP? Because FTP has no built-in file size limit. (Email attachments, by contrast, are generally capped at 10MB or less.) For getting a few hundred megs into the hands of somebody on the other side of the world, right away, this can be extremely useful.
Comparing Film and Video
Update (2011): This was written just before the release of the Red camera. 4K acquisition in high-end video is now routine.
This graphic compares acquisition resolution, the best image you can acquire through a camera (in other words, the quality of your input). 35mm film, benefiting from about 175 years’ worth of improvements in chemical photography, comes out the clear winner:
However, the gap between video and film narrows considerably when it comes to storage resolution, the best image you can extract from your storage medium (the quality of your output). That’s because the perceived quality of an image is influenced more by acquisition resolution than by storage resolution.
Consider the extreme ends of our scale–an image shot on a 35mm film camera and then transferred to VHS tape will, subjectively, look far better than an image shot on a VHS camera and recorded straight to VHS tape, even though the actual storage resolution is in each case the same.
And when you consider that an image stored on analog film must be copied several times before it’s incorporated into a finished work, with accompanying generation loss, you can argue that a lower-resolution but lossless digital storage medium can still hold a final product of comparable subjective quality.
In other words, the current limitations of video are mostly the fault of the video cameras, not the video formats themselves. As a result, animators have a handy way to “cheat.” If you acquire your images with an ordinary multi-megapixel digital still camera, or render them straight from software, you can output to HD video and achieve a result that compares favorably with 35mm film.
Exporting from Flash
Monday January 22nd 2007, 7:41 am
Filed under:
FlashFlash has a good set of export options, but I think they’re marred by bad menu design choices and some confusing variations across versions and platforms. Publishing a SWF is straightforward enough, but if you’re exporting to video formats, there are some potential pitfalls to avoid.
Question 1. Are you working with non-interactive animation only—no Movie Clip symbols or ActionScript? Then export to a PNG image sequence. Sure, it may be tempting to skip the hassle of reassembling the resulting folder full of images in a program like After Effects or Final Cut. But this is the only way you’ll be guaranteed perfect frame accuracy (one image file for each frame on your timeline) and a working alpha channel, no matter what Flash version you’re using. In my experience, all versions, Windows and Mac alike, behave identically with this option.
However, if you do use Movie Clip symbols or ActionScript in your project, then your options depend on which Flash version you have.
Question 2. Do you use Flash 8 or earlier? Older versions have no built-in way of recording real-time events to video, which means Movie Clip symbols won’t display properly and ActionScript will be ignored. So you’ll need to publish to a SWF, then run the SWF and find a way to record the results. The simplest aproach is to use a screen-capture program like Snapz (USD $70, OS X) or Fraps ($40, Win).
You could also record out over analog video to a DV camera or similar device, but unless you have a specific reason to prefer this option, I wouldn’t recommend it—it’s a hassle to set up, and there are a lot more variables to contend with that could potentially affect image quality. A third alternative, also impractical for most purposes, is to set up a video camera on a tripod and record straight off your LCD monitor. (With a good camera and an experienced operator, this can be quite nice.) None of these methods, unfortunately, will preserve an alpha channel.
Question 3. Do you have Flash CS3 or later? In more recent versions, Adobe added a built-in screen capture option for recording realtime output, alpha channel included. Unfortunately, they made the terrible decision of hiding this important feature in the menu File / Export / Export Movie / Quicktime. In most other programs, a menu option like that will give you a frame-accurate copy of your project, and this is emphatically not the case here—remember, it’s a record of a real-time performance, not a rendering of each frame in your timeline. Why couldn’t they have just named it something else?
Sound in Flash
Monday January 22nd 2007, 3:52 am
Filed under:
Flash,
SoundWorking with sound in Flash can be a bit confusing, since it doesn’t behave like the sound or video editing programs you may be used to. Here’s how to add a basic audio track to your animation:
Step 1. Import an audio file. (For best results, use an uncompressed format like AIFF or WAV. Also, be aware that older versions of Flash may have trouble with audio sampling rates higher than 44.1 kHz.)

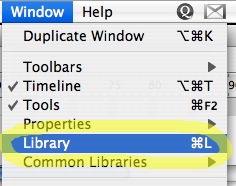
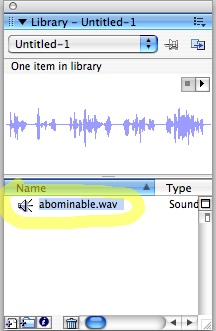
Step 2. Go to your Library window, where you should see the file you just imported:
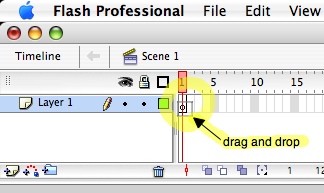
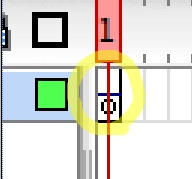
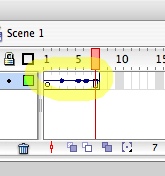
Step 3. Drag and drop the file from your Library to the first frame of a new layer. The frame’s icon will change and display a tiny, oh-so-subtle horizontal line.
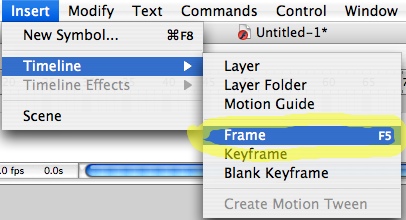
Step 4. That horizontal line is actually the very beginning of your audio waveform. But, as always in Flash, space only exists on the Timeline where you deliberately create it. Add more time to your sound layer with the Insert Frame command. (F5 is the shortcut for this; it’s worth learning, as this is something you’ll have to do a lot.)
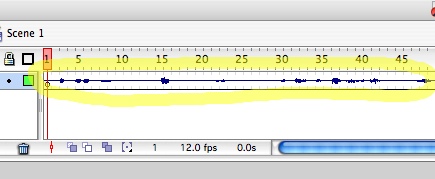
Step 5. Add frames to your layer until the entire sound file is visible. (Remember that you can select multiple frames–you don’t have to make them one at at time.)
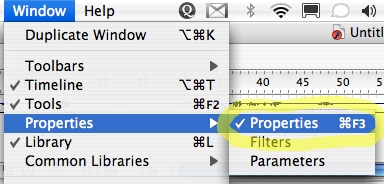
Step 6. Next, bring up your Properties window:
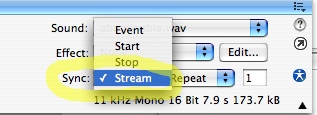
Step 7. Set the sync mode to Stream. Newer versions of Flash should do this automatically, but it’s worth checking. The other sync modes have their uses too, but this is generally easiest to work with. (I prefer to stick with this and do any additional sound editing in a dedicated program.)
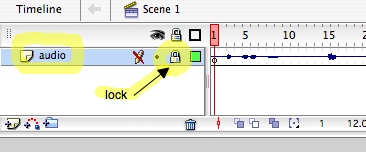
Step 8. You might want to double-click on your sound layer and give it a helpful name, like “audio.” Then click the Lock to prevent any changes (you don’t want to accidentally shift your sound layer around later on).
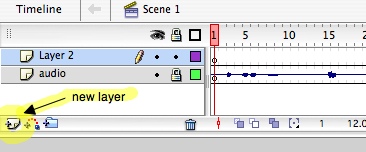
Step 9. Make a new layer, and you’re ready to start drawing.
Fast and Easy Backups
Tuesday January 09th 2007, 1:58 am
Filed under:
OS X / MacOSI’m truly impressed by RsyncX, a free OS X backup utility. Now that hard drive size has outstripped the backup abilities of your standard DVD burner by a factor of 20 or so, I think your best bet is to keep a current copy of your hard drive on a large external drive, and that’s exactly what RsyncX lets you do.
Basically, the first time you run this neat little program, it clones your original drive to the backup drive–a lengthy process if you have, say, 80 gigs of stuff. Then, each time you run it after that, it only copies the files that have changed since the last backup, which is much faster. It works beautifully, but it can be hard for a new user to figure out exactly how to get started. (SuperDuper is a US$30 app with the same functionality and an easier interface.)
Step 1. The first thing you’re going to want to do is partition your new backup drive (not, it goes without saying, your original drive!) using the Disk Utility. Create one partition the same size as your original drive to use for backups, and leave the rest of the space free for other uses:

Step 2. Next, start up RsyncX, drag your original drive to the Source field, and your backup drive to the Destination field. Be sure not to get them mixed up!
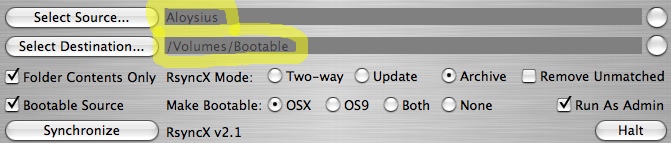
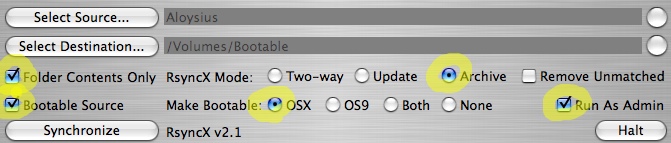
Step 3. Then set the following options. This will copy the entire original drive over to the backup drive:
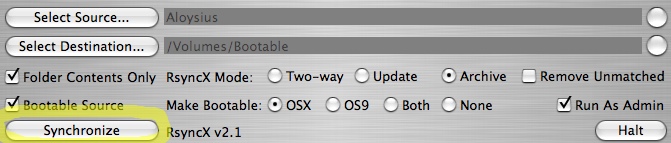
Step 4. When you’re ready to start, click Synchronize. For an average-sized drive, this first backup is probably best left running overnight.
Step 5. For subsequent backups, use these settings, so you copy over only files that have changed since the last backup. The Remove Unmatched setting deletes any backup files that are no longer present on the original drive–I think this is a good thing, because it’s best if you use RsyncX to keep your backup drive perfectly identical to your original. You can use another partition, or another drive, for general storage purposes.

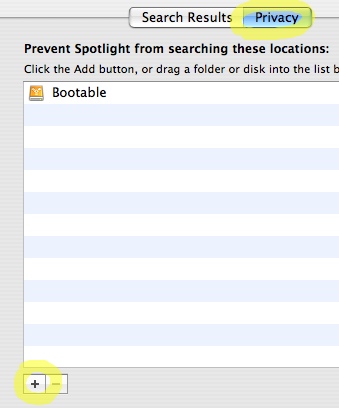
Step 6. An extra step for Tiger users–the Spotlight search utility will try to index your whole backup drive after each use of RsyncX. Since you already have your identical original drive indexed by Spotlight, I think it’s just a waste of time. Go to the Spotlight preferences and disable indexing for your backup drive:
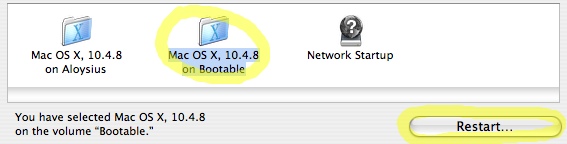
Step 7. Finally, go to the Startup Disk preferences and try booting off your backup drive. (Be aware that a backup created on an Intel Mac will only be bootable on Intel Macs, although you can still read the files themselves on older machines.) Don’t forget to switch back when you’re done!
Improve Wireless Range
Thursday October 05th 2006, 9:56 am
Filed under:
InternetIn the course of figuring out how to get good wireless reception throughout my new apartment, I discovered a few very useful tricks.
Step 1. First, find a utility to detect wireless networks in your area, like the excellent MacStumbler. See if a network shows up with a channel number near yours. If so, it might be causing interference and shortening your range. 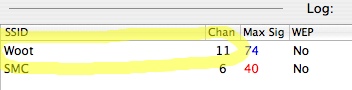
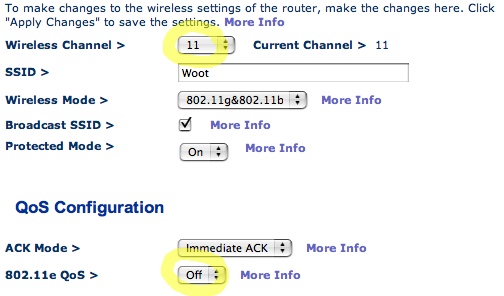
Step 2. Go back to your router’s web control panel and experiment with changing the channel number to something further away from the other network. (If your router offers auto channel select, it’s worth trying that too–although I haven’t seen it do a very good job of avoiding interference.) My router was set to channel 7 out of the box, which was too close to the neighbors’ network on channel 6. After switching to channel 11, I saw my range improve.
While you’re at the control panel, you might want to also experiment with turning off any “special modes” that the router manufacturer has left enabled by default. Here, unchecking “802.11e QoS” solved a problem I was having with dropped connections. (This happens because these special modes deviate from established industry standards, which can have unpredictable results on your particular computer.)
Step 3. If that doesn’t help enough, you may have to reduce the security of your wireless network in order to squeeze a little more coverage out of it–you’ll have to decide if you’re willing to make that tradeoff. WEP and WPA encryption, the most common security options available to you, will reduce your antenna’s range. However, if you have a newer router, you might not need to compromise—before trying any of the steps below, see if you can set your encryption type to WPA2/AES. It provides decent protection without a significant range or speed penalty; if your router and computers can handle the new “N” wifi standard, instead of only “B” or “G,” this is likely to work well.
Step 4. If you don’t have WPA2/AES support, your encryption options are less attractive. Experiment with WEP, the original password-protection option for wireless networks; it’s relatively easy to defeat and won’t let you choose your own password, but it will only slightly shrink the area your network can cover. Although its successor, WPA, lets you pick your own password and provides better security, it doesn’t work with older operating systems, and its range penalty is more severe.
So if you’re willing to accept weaker protection in order to get better range, head to your wireless router’s web control panel. (Typically, you get there by typing 192.168.1.1 or 192.168.2.1 into any web browser while connected to your router.) If you’re using WPA, try WEP, and if you’re still not getting enough coverage, turn them both off.

Step 5. With both WPA and WEP disabled, we’re going to set up the third security option, MAC address filtering. It takes a bit more work to turn on, and the protection it provides isn’t too strong, but it gave me a dramatic range boost, and it’s enough to keep out casual visitors. Each computer has a unique MAC address, and we’re going to set up the wireless router to only accept connections from computers with specific addresses.
Start by going to your Network preferences (this will work more or less the same way in Windows, too). Copy the MAC address. (Here, it’s called an “Airport ID”–see why this isn’t method isn’t more commonly used?) Ignore any spaces, colons (:), or other separators.

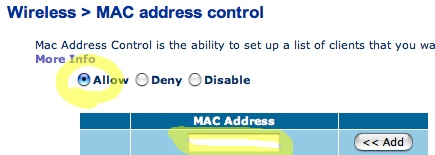
Step 6. Next, find the MAC address filtering option in your router’s web control panel, and turn it on. Choose “allow,” and then carefully enter your MAC address in the space provided. Be sure it’s correct! (If you lock yourself out accidentally, connect to the router with a wired ethernet cable, go to the web control panel, and delete the offending entry from the list.)
Step 7. Once you have everything set up, there are two last things you can do to improve security. You can hide your SSID, so the first time you access your network you have to type its name in manually.
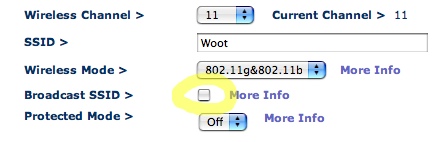
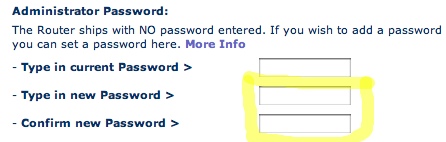
And you can set a router password to protect your web control panel settings.
Simple Masks in Final Cut
Tuesday July 18th 2006, 6:48 pm
Filed under:
Final CutIf you’d like to put a mask around your video in Final Cut, you can do it easily with a quick trip to Photoshop. ( By the way, this trick will work in almost any video editing program.)
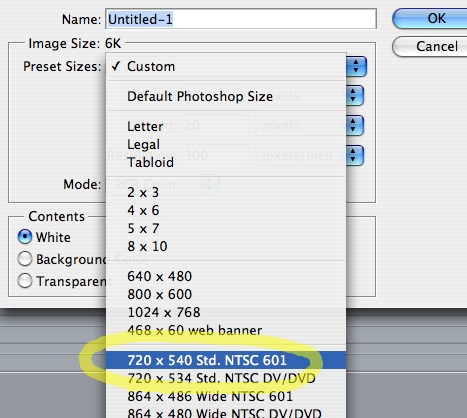
Step 1. Create a new image in Photoshop. For NTSC video (the standard in North America and part of Asia), make it 720 x 540. For PAL video (the standard in the rest of the world), make it 768 x 576. As you can see below, Photoshop helpfully offers these sizes as menu options.
Note: If these dimensions seem a little different from what you’re used to, remember that many modern video formats (DV and DVD, for example) are anamorphic. That means they require a “squished,” or distorted, recorded image, which they restore to normal size when they play back. We’re using the proper unsquished dimensions to create our masks; Final Cut will take care of the resizing automatically.
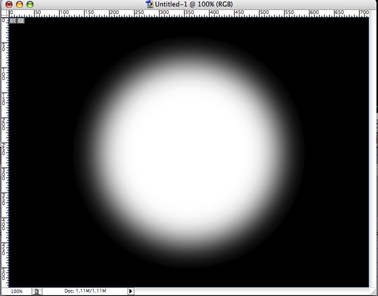
Step 2. Make your mask. Use black for any areas you want completely blocked, and white for any areas you want completely visible.
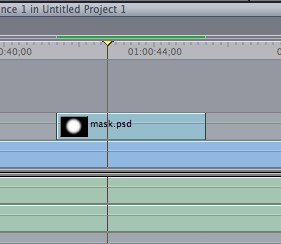
Step 3. Drop the mask image onto your Final Cut timeline, placing it on a new track above your original video.
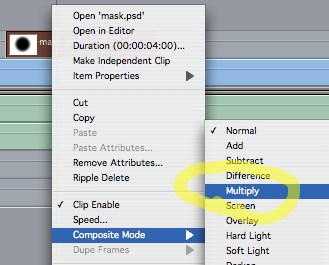
Step 4. Right-click (or control-click, on a one-button mouse) on the mask clip to bring up the Composite Mode menu. Choose Multiply.
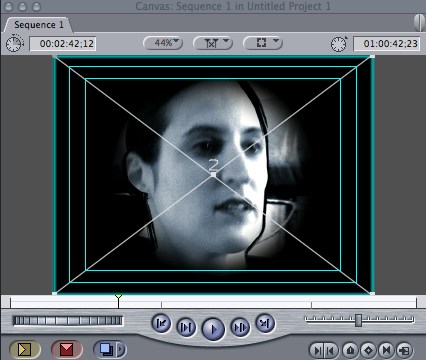
Step 5. Your original video on the track below should now be visible through the mask.
Bluetooth Disappears
Here’s an easy one: if you have a Mac with built-in Bluetooth, and your Bluetooth icon suddenly grays out, and clicking on it gets you a “Not Available” message, and your System Profiler insists you have no Bluetooth adapter at all…?

Unplug all your USB devices, turn the computer off (don’t just reboot), and turn it on again. Drove me nuts.
Canon Scanner Can’t Sleep
I like my Canon LiDE60 scanner, but I recently discovered that it hasn’t been playing well with my Powerbook when I leave the room–a program installed in the background along with the scanner’s drivers will wake up the machine periodically when it tries to go to sleep.
The offending app is called the Button Manager, and it runs the easy-access controls on the front of the scanner. The buttons won’t work without it, but that’s a minor sacrifice compared to all that unnecessary wear on your system. A handful of websites diagnose the problem, but there don’t seem to be any step-by-step instructions for killing it. So:
Step 1. Go to your main Library folder on your boot drive, and look in CFM Support.
Step 2. Rename anything you see named Button Manager, so it will no longer load on startup. (If you rename, instead of delete, you can always go back later if you decide you really need those front-panel buttons.)
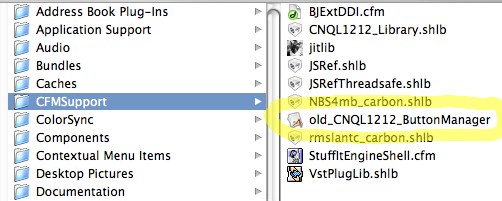
Here, I’ve renamed CNQL1212_ButtonManager to old_CNQL1212_ButtonManager. Depending on your system, you may have multiple Button Managers. Do ’em all.
Step 3. Reboot and test it out. This trick may not work if you have the scanner attached through a USB hub…your feedback is welcome!