App Compatibility in OS X
Tuesday August 16th 2011, 12:36 pm
Filed under:
OS X / MacOSGuessing which of your applications is broken following a major OS upgrade is a familiar ritual for Mac owners. Use these tools to learn what will need to be replaced:
- If you’re upgrading to 10.6 Snow Leopard, download and run the SnowChecker utility to check whether you have any incompatible software.
- For 10.7 Lion, use the RoaringApps wiki.
Reverse Telecine 24p
Tuesday April 19th 2011, 2:36 pm
Filed under:
Final CutIn 2012, interlaced video is 90 years old, so little wonder it’s a hard standard to completely get rid of. Many cameras capable of shooting true 24p video still have to save the images in interlaced formats called 24pA and 24PsF. But this is only a temporary inconvenience; with a bit of extra effort it’s possible to reconstruct the 24p original in Final Cut 7.
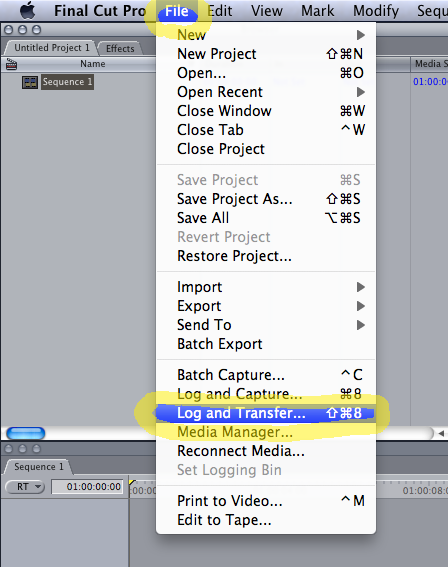
Step 1. Choose File / Log and Transfer.
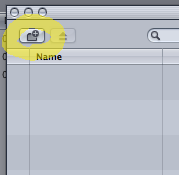
Step 2. Click this obscure icon to import files.
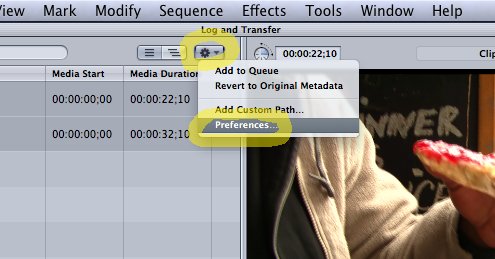
Step 3. Click this other obscure icon to view your Preferences.
Step 4. Make sure Remove Advanced Pulldown and Duplicate Frames is checked. Use ProRes as your video codec.

Step 5. Select the clips you want to transfer, or else choose Edit / Select all.

Step 6. When you’ve made your selections, choose Add Selection to Queue to begin transferring.

Step 7. Once you’ve transferred your clips, click on your Sequence.
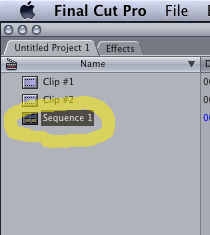
Step 8. Go to Sequence / Settings.
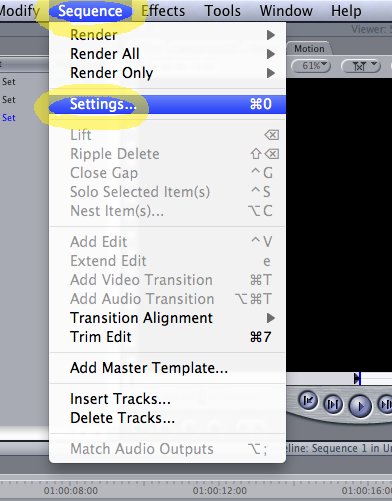
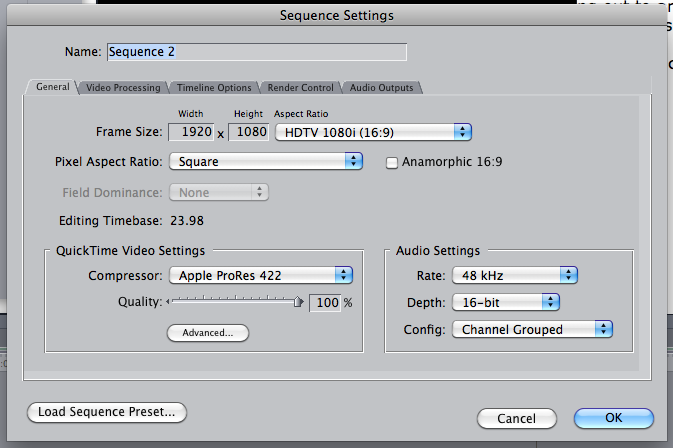
Step 9. The default settings probably won’t be what you want, so click Load Sequence Preset.
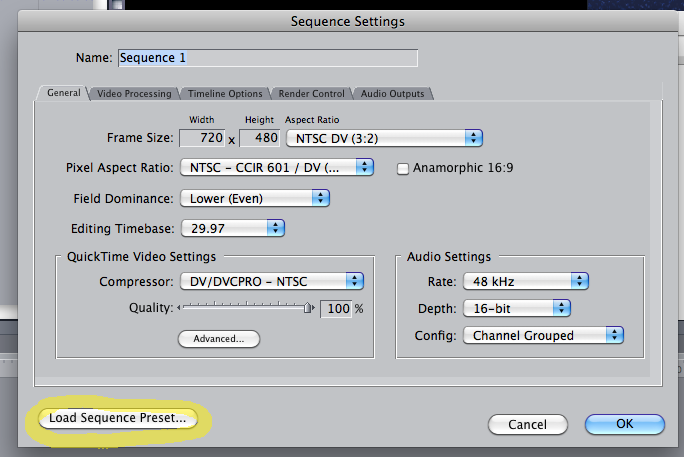
Step 10. Choose Apple ProRes 422 1920×1080 24p 48KHz as your preset.
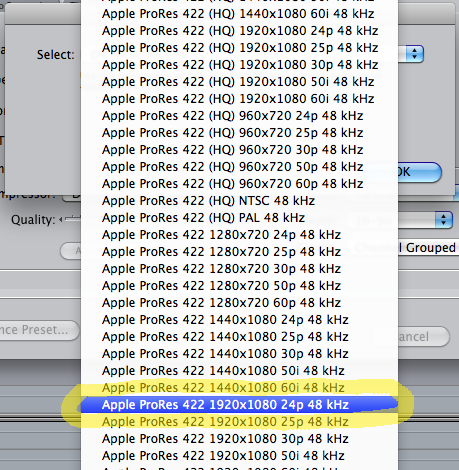
Step 11. After loading the preset, your settings should look like this.
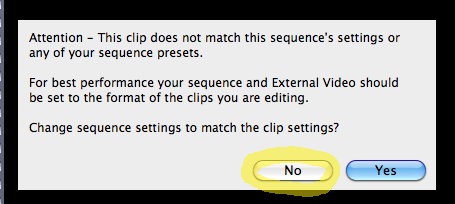
Step 12. When you add clips to your sequence, you’ll be presented with this warning. Be sure to click no.
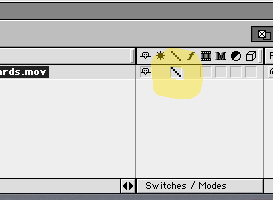
Step 13. The thin green bar indicates that a realtime reverse telecine effect has been applied. You should now be able to view and export clean deinterlaced frames.

Kinect and XML
Wednesday March 30th 2011, 7:55 am
Filed under:
Kinect(Check out the rest of the Kinect section for more tutorials.)
Update: Our XML-based Kinect mocap tool now has its own website, kinecttopin.com. For general Kinect setup help, look here.
To record joint data or OSC output by the OSCeleton Kinect mocap utility to an XML file, to play back the XML, or to convert it for use in After Effects, get this KinectToPin Processing sketch from GitHub.
…the practical upshot of this? You can send all your motion capture information to your XML file in realtime, without worrying about capturing your video image. Then, you can read the file back later and do all the complex rendering you want in full HD. By the way, the sketches will work with anything that uses OSC, not just a Kinect–all you have to do is modify the XML tags to suit your needs.
Installation Checklist
Wednesday March 23rd 2011, 6:22 am
Filed under:
Concepts1. Computers:
- How many computers does this run on?
- What are their specs (RAM, CPU, GPU, storage, etc.)?
- Do they need to communicate?
- What types of network connections do they have (AC wifi, gigabit ethernet, etc.)?
- Do they need any peripherals (mouse, keyboard, Wiimote, Kinect, etc.)?
- What types of peripheral connections do they have (USB, Firewire, Bluetooth, etc.)?
2. Media
- What’s your storage medium (HDD, SSD, optical disc, etc.)?
- What’s your backup strategy (RAID, offsite backup service, Time Machine, disk image, cloned spare drive, optical disc, etc.)?
- Will there be an attendant present in case the computers crash?
3. Video
- How is the video being presented (projector, LCD, CRT, LED wall, etc.)?
- Is there live video input?
- Does it need to be recorded?
- What kind of cameras are you using (DSLR, webcam, industrial, DV, etc.)?
- Does your camera have a usable “live view” mode?
- How are they connected to the computer (USB, Firewire, analog cable, etc.)?
- Do they have manual focus/iris/white balance?
4. Audio
- How is the sound being presented (built-in speakers, external amplifier, stereo, 5.1, etc.)?
- Is there live sound input?
- Does it need to be recorded?
- What kind of microphones are you using (shotgun, contact, cardioid, lavalier, etc.)?
- How are they connected to the computer (USB, Firewire, analog cable, etc.)?
- Do they have manual gain control?
5. Sensors
- What other types of live input do you need (light, temperature, vibration, tilt, acceleration, etc.)?
- How is the data being presented?
- Does it need to be recorded?
- Can you find commercial products that fit your budget, or will you need to make your own sensors?
- How are they connected to the computer (Raspberry Pi, Arduino, serial port, etc.)?
- What external hardware controls do you need (on/off switch, gain, threshold, status lights, etc.)?
Types of Animation
Wednesday March 23rd 2011, 6:20 am
Filed under:
Concepts1. Time-lapse: Photographing a scene only at selected intervals, creating an illusion of spontaneous change when played back. The earliest form of animation, predating live-action cinema; various playback methods for time-lapse photos were established by the 1830s.
2. Stop-motion: Photographing a single object and moving it while the camera is stopped. Can be done with paper cut-outs, puppets with poseable armatures, or even cooperative human actors (pixilation, which with this spelling has nothing to do with computers, meaning “possession by evil spirits”). Quickly adopted in the 1900s for visual effects in early silent films.
3. Replacement: Replacing the object being photographed with a different object while the camera is stopped. Classical animation is replacement animation using pencil drawings on paper or ink on plastic cels; this technique dominated animated feature production until the late 1980s. Less common variations use photo collage or sculpture. First came into wide use with “lightning artist” vaudeville acts in the 1910s, where audiences would watch an animated film being made.
4. Rotoscoping: Using live action as a frame-by-frame reference for animation. Traditionally done by projecting film footage and tracing it, a common technique by the 1940s. Motion capture is a modern variant of rotoscoping, in which the analysis of movement is done with a computer instead of by hand.
5. Analog Computer Graphics: Also known as computer-assisted graphics, generating images via commands sent to an external hardware system, such as a motion-control camera or CRT electron beam. Early examples exist from the 1940s; videotape-based systems called video synthesizers were in use by the 1960s.
6. Digital Computer Graphics: The most common form of animation in use today, generating images within a computer system by manipulating a set of numerical values in memory, instead of through the direct control of hardware. Common digital representations of an image are as a grid of colored dots (pixels), a set of spatial coordinates (vertices), or a combination of both. The best-documented early examples appear in the 1960s and wide adoption occurs by the 1990s.
For a more detailed timeline, see A Biography of the Pixel by Alvy Ray Smith.
Kinect Setup Links
Wednesday March 23rd 2011, 6:02 am
Filed under:
Kinect(Check out the rest of the Kinect section for more tutorials.)
The Kinect has two basic tricks–first, it grabs a depth map, and second, it figures out the joint coordinates of your skeleton from the depth map. There are lots of easy-to-use options for the first trick, but not so many for the second. Still, even using the depth maps alone, you can track motion more effectively than with most RGB methods.
0. Easiest Installer Options (current—start here!)
There are now some easier installer options for OpenNI/NITE—I recommend starting with these! Here are:
1. Depth Maps (outdated)
On a Mac, you can get started quickly—for an initial test, you can run CocoaKinect, a small app that just displays the depth map. Then there’s a Processing library and a Max/MSP/Jitter external that work out of the box. You can also get a Quartz Composer plugin that also runs on the latest version of Isadora, but its installation is slightly more complicated. Which brings me to:
2. My Bundles (outdated)
With few exceptions, installing software for the Kinect requires getting a program from site A, a couple of drivers from sites B and C, and an installation tutorial from site D. To get you started quickly, I’ve collected all the bits you need to install:
I made these bundles for my own convenience, and they’re all almost certainly out of date as you read this, so once you have them up and running you should get updated versions of the programs and drivers from the original sources listed here.
3. Skeleton Tracking (outdated)
On Windows, there’s BrekelKinect, a slick-looking all-in-one utility that can capture depth maps and do skeleton tracking, recording joint coordinates to BVH files (usable with Maya or other 3D programs). (It might be able to communicate live with other programs, but I haven’t tested that.)
On Mac, Windows, and Linux, there’s OSCeleton, which sends joint coordinates out as OSC data. It’s quite a bit harder to set up than BrekelKinect, but it has the ability to do live skeleton tracking and pass the information on to other programs. Here’s an example receiver patch for Isadora. (A warning, you’ll need to use Terminal commands to install OSCeleton. If you’re not comfortable with that, I’d start with one of the ready-to-use alternatives and dive into OSCeleton when you have a full day to spend poking at it until it works. Here’s a Mac setup tutorial.)
Synapse (Mac/Win) is another powerful skeleton-tracking OSC app to experiment with, although it works somewhat differently than OSCeleton. It’s an all-in-one download that’s very easy to set up.
OSCulator (Mac) is an OSC routing app that can help you manage all the information that these OSC apps pump out; use this config file to get started.
4. To talk to Flash, you can use another app to get the Kinect data, analyze it, and send OSC using Flosc (Mac/Win/Linux) or Oscar (Mac). Other Flash options are AS3Kinect (Mac/Win/Linux) and Beckon (Win).
Point Cloud to Mesh
Tuesday December 07th 2010, 8:31 pm
Filed under:
Kinect(Check out the rest of the Kinect section for more tutorials.)
At US$150, the Kinect camera is the world’s first home 3D scanner, but the point clouds it records aren’t immediately usable in 3D animation programs like Maya. Fortunately, MeshLab, a free utility for Windows, Mac, and Linux, can convert the point cloud into a mesh that you can work with. (Based on this video tutorial by Kyle McDonald and Jason van Cleave.)
1. Render > Show Normal/Curvature
2. Filters > Point Set > Compute Normals for Point Sets
Neighbors 16
Flip Normals checked
-1000 Z
3. Filters > Sampling > Poisson-disk Sampling
Samples:5000
Base Mesh Sampling Checked
4. Filters > Point Set > Surface Reconstruction: Poisson
Octree: 12
Solver: 7
5. Filters > Remeshing > Subdivision Surfaces: LS3 Loop
6. (Optional) Filters > Cleaning > Remove Faces from Non Manifold Edges
7. Filters > Sampling > Vertex Attribute Transfer
Source: [original filename]
Target: Poisson Mesh
Transfer Geometry
Transfer Normal
8. Filters > Remeshing > Quadric Edge Collapse Decimation
Preserve Boundary
Preserve Normal
Preserve Topology
9. Filters > Cleaning > Remove Duplicate Vertex
10. Filters > Cleaning > Remove Isolated Pieces (wrt face num)
Gmail Reply-To Address
Wednesday September 08th 2010, 4:58 pm
Filed under:
InternetStep 1. Go to Settings.

Step 2. Go to Accounts and Import.

Step 3. Choose Send mail from another address.

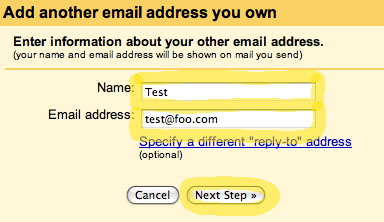
Step 4. Enter your preferred name and address.
Step 5. You probably want to leave this setting at Send through Gmail.

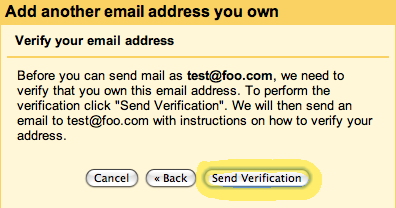
Step 6. Send yourself a verification email and confirm that you own the email account.
Step 7. Once you’ve verified the address, it will appear as an option under Accounts and Import. Click make default and Always reply from default address, and all your Gmail replies will now use your new address.
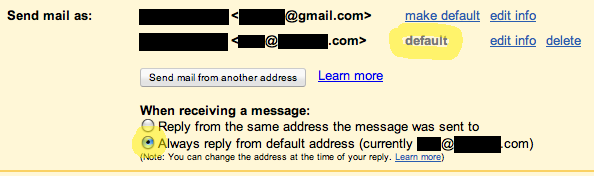
You can undo this at any time just by clicking make default for your original Gmail address—you don’t need to repeat these steps.
Managing Flip Camera Files
I. Copying Camera Files to the Computer
Step 1. When you connect the Flip to your computer for the first time, it will automatically install the FlipShare software.
Step 2. Use FlipShare to copy the source video files to your computer.
Step 3. If the Flip tries to charge itself while also copying a big file, especially in hot weather, it may complain of overheating and shut down. If this happens, disconnect the camera, remove the battery, and try again.
II. Merging Multiple Camera Files into One
Step 1. If you try to merge the source files with FlipShare, it will insist on adding a dissolve between each one. So instead, download a program called MPEG Streamclip.
Step 2. In MPEG Streamclip, choose File / Open Files and select all the source files you want to merge.
Step 3. Choose File / Save As, and MPEG Streamclip will merge the source files into one clip.
Step 4. If you intend to copy the file back to the camera, make sure the merged clip’s running time is under half an hour. The Flip camera may refuse to play a longer file. If your video is too long, consider dividing it into parts.
III. Editing in Final Cut
Step 1. Import your footage files into Final Cut.
Step 2. Create a new sequence: 1280 x 720, 30fps, 44KHz audio, using the ProRes codec.
Step 3. Export your final master using the ProRes codec. It will be pretty big—estimate at least 1GB per minute, and probably more. That’s OK; just make sure you have enough space.
Step 4. If you intend to copy the file back to the camera, make sure your final master’s running time is under half an hour. When exporting from Final Cut, the file size (GB) is not important. Only the running time matters. The Flip camera may refuse to play a longer file. If your video is too long, consider dividing it into parts.
IV. Copying Computer Files to the Camera
Step 1. Make sure your file is 1280 x 720, 30fps, 44KHz audio. If you are using clips straight from the camera or merged in MPEG StreamClip, there will be little chance of this being changed. If you’re not getting the correct results out of Final Cut, double-check your sequence settings.
Step 2. In FlipShare, choose File / Import to copy your computer files into FlipShare’s media folder on your hard drive. This is an annoying, but necessary step–just copying them to the camera directly won’t work. On the bright side, FlipShare will automatically take care of any format conversion that needs to be done. Be prepared; it takes a long time.
Step 3. FlipShare’s Import command will convert your files into 1280 x 720, 30fps, 44KHz MP4s. At this point all files must be under 2GB—that’s half an hour of running time in this video format—or the Flip will not be able to play them reliably. (The Flip is supposed to be able to handle files up to 4GB, or one hour, but I found those would occasionally freeze or otherwise misbehave. In fact, I would aim for no more than 1.8GB to be absolutely safe.) Once again, if your files are over the limit, consider dividing them into parts.
Step 4. The imported files should now be visible in FlipShare’s media browser. Sometimes they arrive named “Untitled,” unfortunately. If this happens, right-click on the thumbnail and choose Rename to give the file a useful name again.
Step 5. Make sure you have enough free space on the camera; you can use FlipShare to move more camera files to your computer and delete them from the camera if necessary. When you’re ready, select your files and choose File / Save to Camcorder to copy them back.
Step 6. If the Flip tries to charge itself while also copying a big file, especially in hot weather, it may complain of overheating and shut down. If this happens, disconnect the camera, remove the battery, and try again.
V. Finishing Up
Step 1. Eject the Flip, replace the battery if necessary, and play any files you copied to it to test that they work.
Step 2. Burn a DVD or make some other reliable backup of the original source files before deleting them from your hard drive.
Faster After Effects
After Effects is a powerful tool, but it can be frustratingly slow, especially on older computers. And, with HD files being six times as big as before, even newer machines can bog down quickly. Try these tricks to speed things up.
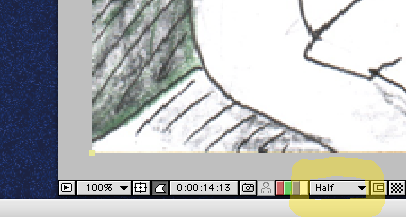
Step 1: Lower the display resolution from full to half—or third or quarter for older machines. This is especially important with HD.
Step 2: Turn on low quality for layers that have lots of effects applied.
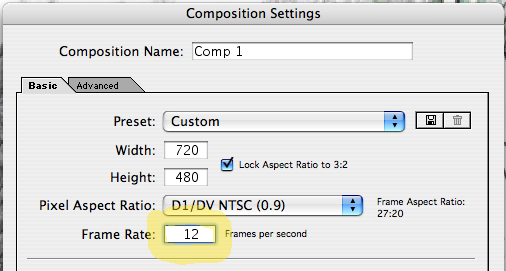
Step 3: If you’re working with frame-by-frame animation, go to Composition Settings…
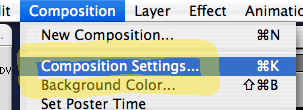
Step 4: …and try reducing the frame rate by half. (This isn’t as useful if you’re working with live action or prefer a smoother look.)
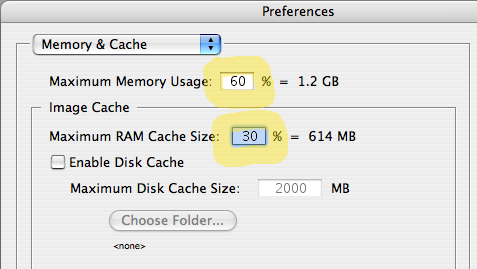
Step 5: Go to the Memory & Cache preferences…
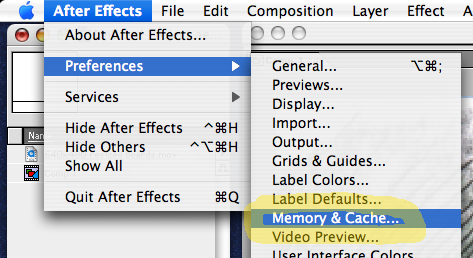
Step 6: …and reduce the percentage of RAM that After Effects is allowed to use. You’ll have less space available for RAM previews, but things might run faster overall.