Making Machinima
If you’re interested in experimenting with “machinima”–real-time animated performance using customized video games–a USD $25 shareware app called Machinimation, by Fountainhead Entertainment, is a good place to start. (The company has since appeared to shut down; I’ll keep it here unless I receive a request to remove it.)
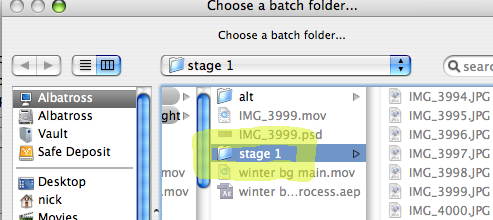
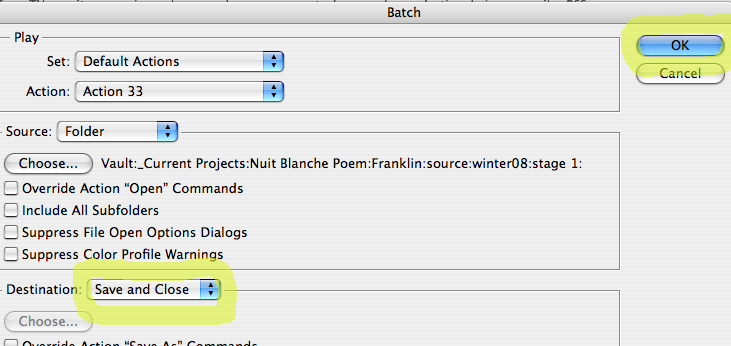
The program comes with a generic character model and several locations to test out. It can also import assets formatted for Quake 3, or models that you create yourself. You record your action in “takes,” playing your character and up to 31 others simulataneously. (Each player will need their own networked computer; fortunately, Machinimation sets this up for you transparently.) If you have characters who won’t need to interact in real time, they can be recorded in subsequent takes and popped in afterwards, without needing any additional computers.
The included manual needs clarification on a few points:
1. Importing New Assets. The manual makes it seem like adding models and sounds is a straightforward process, but in fact it’s fairly tricky. Machinimation needs all assets dropped into a particular subfolder (which, a bit confusingly, is also named “machinimation”). They then need to be converted into PK3 format. Fortunately, this is nothing but a renamed Zip file–zip your sound or model with WinZip or WinXP’s built-in menu option, and then just change the name. Sounds must be 22khz 16-bit mono; you can convert them with Audacity or a similar program. Models must be MD3 files; you can convert them with Milkshape.
2. Making clean edits with no camera movement. As in most animation programs, when you set two camera keyframes, the computer gamely interpolates between them; the result is a camera that never stays still. There are several ways to stop it; the simplest is to right-click on each new camera keyframe as you create it and toggle “hold.” The camera will then cleanly jump to the new position.
3. Adding background music. If you add a background music track and then begin recording, it will only play to the last keyframe that existed up to that point! In other words, if the new material you’re recording runs longer than your existing project (which it almost certainly will, at least at first), the music just cuts off. There are two ways to fix this. First, you can add a keyframe past the end of your music track. (Machinimation counts by frames at a fixed rate of 30 fps; a 5-minute song will need a keyframe set at frame 9,000.) Second, you can insert the command music “pathname/filename” at the start of your project, which will cause the track to play through regardless of the length of your project. Use the command music, by itself, to stop playback.
Lightscribe for Mac
Lightscribe CD and DVD burners are neat. They can print a label on specially coated discs with the same laser they use to burn your data. There are a couple significant drawbacks, though–first, expect each disc to take about half an hour to create at present, although future firmware updates may cut that time down. And second, expect to pay twice as much for special Lightscribe media.
That said, this is a pretty nice option if you don’t need to create custom-printed discs more than once in a while, but want them to look nice when you do. If you have a Mac, though:
1. You’ll want to be sure and buy a LaCie brand burner, because they’re the only ones at present with OS X Lightscribe software.
2. You’ll need a template to create your own labels. That way, if you’ve got Photoshop, you don’t need to wrestle with LaCie’s included labelling program. Here’s mine; it’s not perfectly accurate, but it works for me. The Lightscribe process seems to have a pretty decent resolution, so I make my labels 300dpi, just as if they were going to an ordinary printer.

3. You’ll want to buy DVD-R Lightscribe media, not DVD+R. As the older format in this unwelcome format war, DVD-R still has a slight edge in standalone DVD player compatibility. And it’s even more important for Mac users, because older Mac DVD drives won’t read DVD+R. Unfortunately, Lightscribe DVD-Rs seem to be a bit rare. The only ones I can find at present are these HP brand 10-packs from CompUSA. At about US$2/disk, they’re not exactly a bargain.
Wireless File Sharing
It’s pretty simple to set up a direct connection between two wireless Macs:
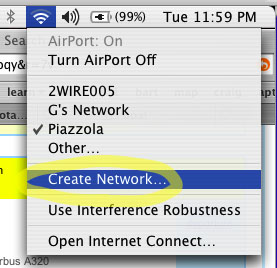
Step 1. First, click on your AirPort icon and choose Create Network.
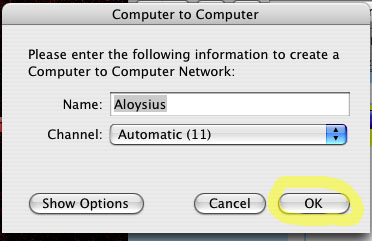
Step 2. Name your network and click OK .
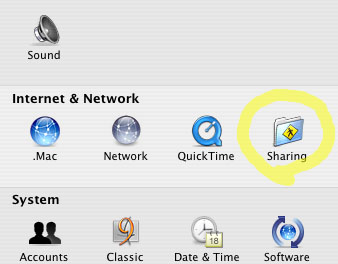
Step 3. Although people can now join your network, they still can’t see anything on your machine. Go into the System Preferences and choose Sharing.
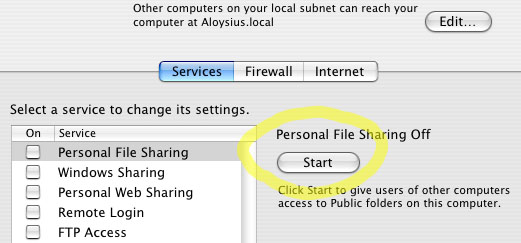
Step 4. Select Personal File Sharing and click Start.
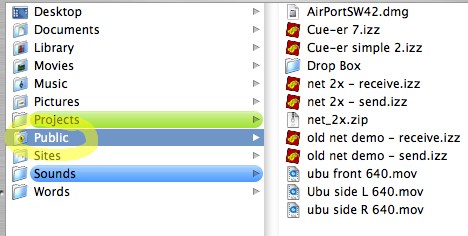
Step 5. Visitors can now access what’s in your Public directory, but they’ll be prevented from nosing around anywhere else.
If you’re interested in theatrical video design, this trick is useful for a lot more than sharing files. Using software like Isadora or Max, you can network several machines together for synchronized video effects. We’ll talk more about that in a future tutorial.
Fix DWG Files in Maya
Wednesday April 12th 2006, 5:15 pm
Filed under:
MayaGetting an Autocad file into Maya without special conversion software isn’t impossible, at least for a simple model:
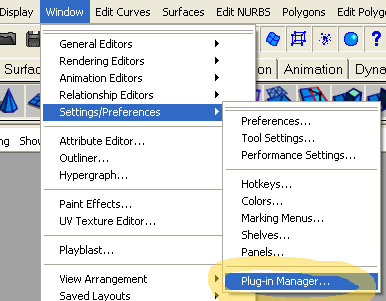
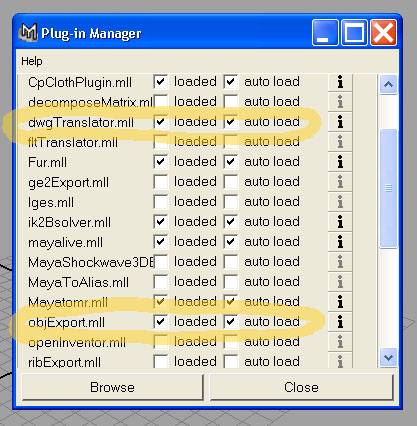
Step 1. Go to the Plug-In Manager.
Step 2. Check that dwgTranslator and objExport are turned on.
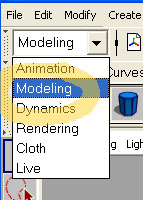
Step 3. Switch Maya into Modeling mode.
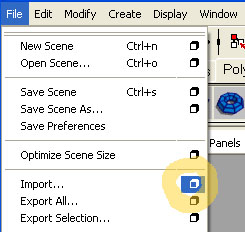
Step 4. Choose the Import option box.
Step 5. Set the File Type to DWG_DXF, and set the Scale Factor to 0.001 (otherwise, Maya will blow your DWG up to an enormous size). Click Import when you’re done.
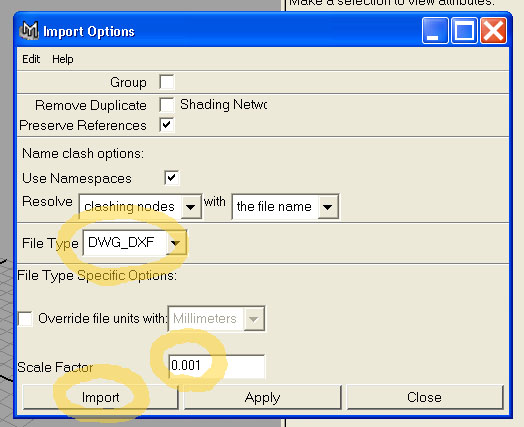
Step 6. Import the file.

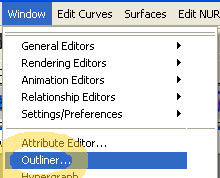
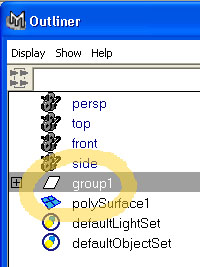
Step 7. Call up the Outliner window.
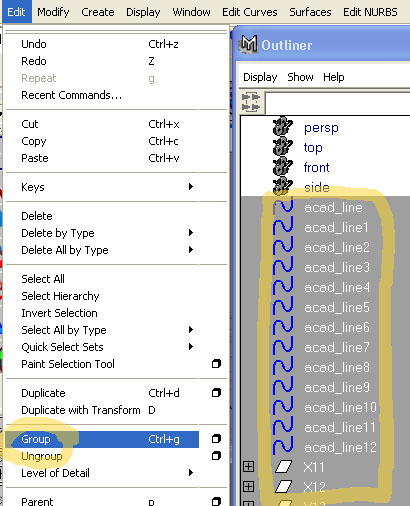
Step 8. DWGs will sometimes arrive in many pieces. Use the Outliner to select all these pieces, and then use the Group command to lump the parts together. (If your file’s parts are already grouped together, you can skip this step.)
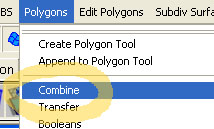
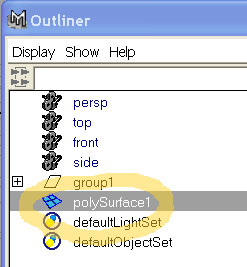
Step 9. With your new group of parts selected, choose Combine from the Polygons menu. This will turn the separate parts into a single object.
Step 10. Make sure your new combined polygon object is selected, or else the next step won’t work.
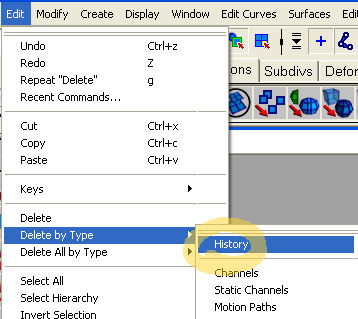
Step 11. Choose Delete By Type/History from the Edit menu. This will break the links between your new object and the old group of imported parts.
Step 12. Select your old group of parts and delete them. (If your new object suddenly disappears instead, you didn’t delete its History properly.)
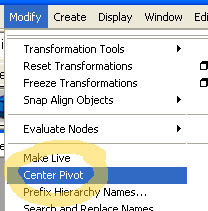
Step 13. The next three steps set up your new object so it works properly in Maya. First, choose Center Pivot from the Modify menu.
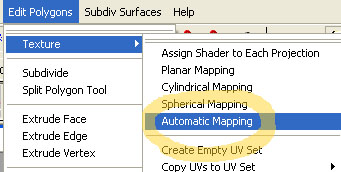
Step 14. Next, choose Texture/Automatic Mapping from the Edit Polygons menu. (You can use any of the commands in the Texture menu to prepare the model for texturing, but I think this is the easiest to start with.)
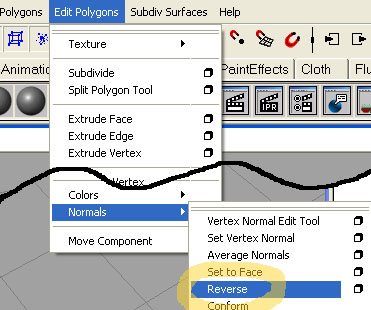
Step 15. Finally, as an optional step, you can choose Normals/Reverse from the Edit Polygons menu if the model appears to be shading strangely.
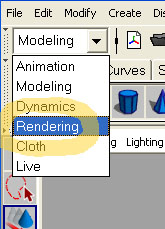
Step 16. That done, you’re ready to texture the model. Switch Maya to Rendering mode.
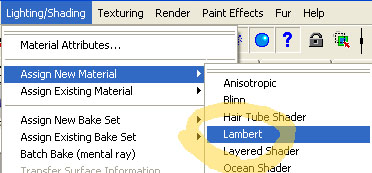
Step 17. Choose Assign New Material from the Lighting/Shading menu. Here, I chose Lambert.
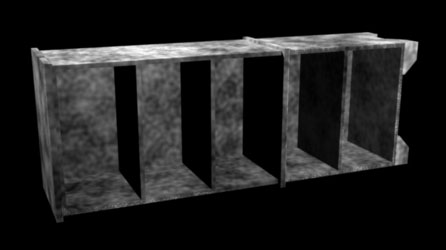
Step 18. Add a texture and check your results–you may need to do some more tweaking before you’re satisfied, but at this point the model should behave normally in Maya.
If you’re still not happy, you might want to try changing your original file’s export settings in Autocad. (I’d recommend avoiding settings that create unnecessary triangles whenever possible.)
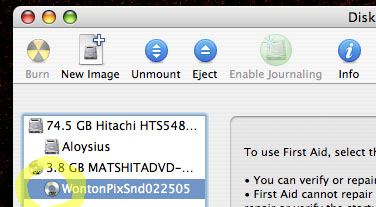
Rip a Disc Image
If you need to run off multiple copies of the same CD or DVD, there’s an easy trick to cut the time it takes in half. If you’re making more than one or two duplicates, I think the extra setup time is well worth it. On Mac OS X, you can use the built-in Disk Utility; on Windows, you’ll need EZ CD Creator, Nero, or a similar CD-burning program. Either way, the concept’s basically the same:
Step 1. Put in your original disc and run Disk Utility from the Utilities folder inside your main Applications folder.
Step 2. You’ll see your CD or DVD appear on the left-hand side of the Disk Utility window. Click on it.
Step 3. Go up to the main menu and choose Images / New / Image from (name of your disc).
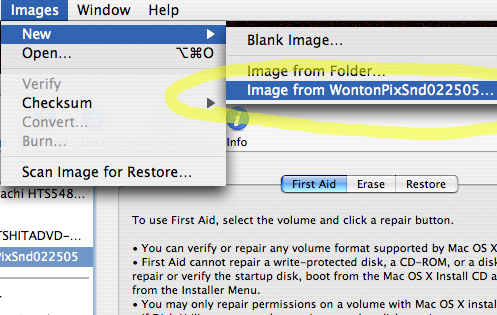
Step 4. Choose DVD/CD Master as your format, and then save it.
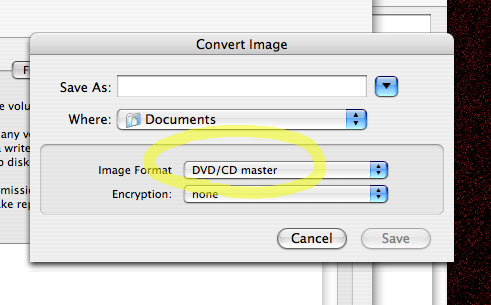
Step 5. Change the new file’s extension (the abbreviation with a dot and three letters that tells you the file type) from .cdr to .iso. This will make sure that Windows and Mac programs alike will be able to tell what it is.
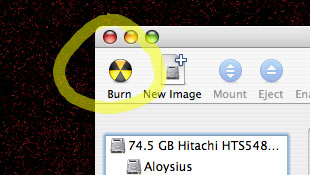
Step 6. The “image” you just created isn’t a graphic; it’s a disk image, an exact copy of your CD or DVD saved on your hard drive. Instead of having to copy the disc by sticking in the original each time, you can burn a fresh copy in half the time by running Disk Utility, clicking the Burn button, and loading your disk image.
See here for more detailed Mac and Windows burning instructions.
Still Images in Final Cut
Monday January 23rd 2006, 1:23 pm
Filed under:
Final CutImporting hundreds or thousands of still images into an editing or animation program is a pretty ordinary task. Final Cut makes it an unnecessarily complicated process, but it can be done:
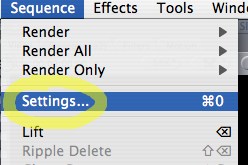
Step 1. Go to your Sequence Settings.
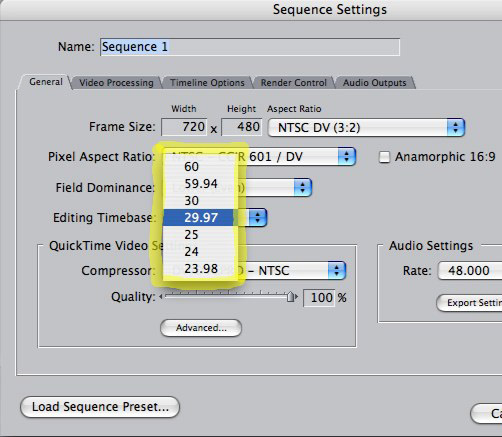
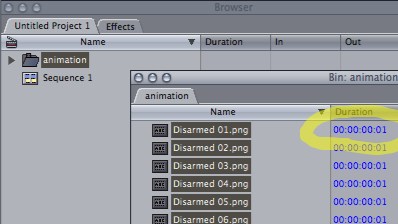
Step 2. Set your sequence resolution and framerate to match your still images. Notice that there’s no straightforward way to set low frame rates like 12 or 10fps, common in animation. For now, if your desired framerate isn’t offered, pick the closest even multiple. If you would like 12fps, for example, you’ll need to pick 24. Yeah, hold on, it gets better.
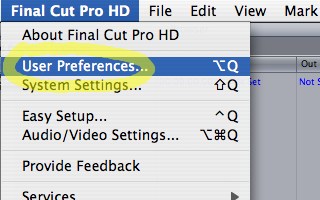
Step 3. Go to your User Preferences.
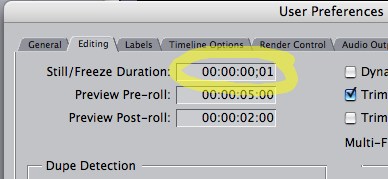
Step 4. In the Editing tab, set your Still/Freeze Duration to the existing frame rate divided by your desired frame rate. If you were able to set the frame rate you wanted in Step 2, then your Still/Freeze Duration should be 1 frame. If you wanted 12fps and had to settle for its closest multiple, 24, your Still/Freeze Duration should be 2 frames. Silly, isn’t it? But that’s what you’ve got to do.
Step 5. Create a new bin, and open it up.
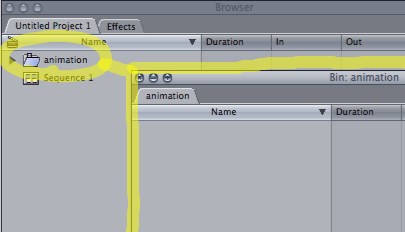
Step 6. Making sure your new bin window is selected, import all your image files. (If you don’t select your bin window first, your still images won’t go into the bin, and the rest of this trick won’t work.)
Step 7. Drag and drop your entire bin onto your sequence timeline. The frames will now play back at their proper frame rate, ready for editing or rendering.

Exporting from iMovie
Wednesday January 04th 2006, 9:01 pm
Filed under:
VideoApple’s iMovie is a great introduction to video editing. It has simple menu options for transferring your finished video to DV tape or DVD disc, but exporting a full-quality Quicktime clip of your movie takes a few extra steps. The designers probably didn’t expect beginners to have an obvious need for such a feature, but it’s a good trick to learn.
A Quicktime clip is the best way to take your iMovie work into another program for further editing. And, burned to a data disc, it can be your most easily-accessible backup. (Most beginning users don’t have have a DV camera or deck hooked up full-time to their computer, but everyone has a DVD or CD drive ready to go.)
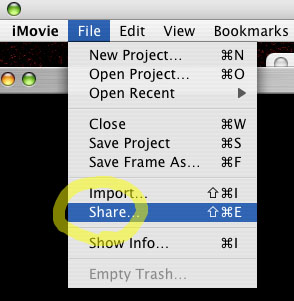
Step 1. Choose Share from the File menu. (Apple probably chose the term “Share” because it sounds less technical than “Export.” Interestingly, newer versions of iMovie have both a Share and an Export menu option. Both do the same thing.)
Step 2. Choose Full Quality DV from the Quicktime panel, and save your file.

Step 3. The resulting file’s name will end in .dv. You can go ahead and change this to the standard .mov, if you prefer.
Laptop Power Settings
Wednesday January 04th 2006, 7:52 pm
Filed under:
OS X / MacOSWhen you’re using your laptop in a live show, the last thing you want is for it to go to sleep on you. While you’re running cues or performing, it might seem wide awake, but if there’s a 10-minute gap where you’re not touching the mouse or keyboard, it might decide to take a nap on you. Make sure you have your power settings properly set before the show starts–here’s how you do it in OS X:
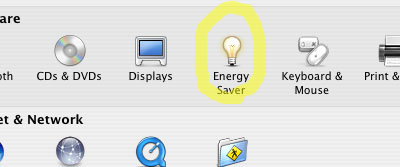
Step 1. First, find the Energy Saver panel in your System Preferences.
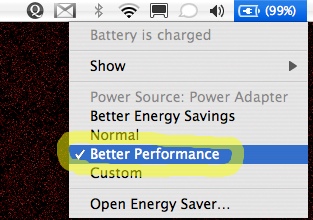
Step 2. For Panther and earlier, choose Highest Performance to shut off all your sleep settings in one swoop. (Be sure to change it back when the show’s done; no need to keep spinning your hard disk all day during normal use.)

The same setting in Tiger is called Better Performance, and you can set it right from the menu bar:
One more power-management tip–no matter what you set here, your machine will probably be faster if it’s plugged in. When you’re running on the battery, most laptops ratchet down their speed as the charge runs out.
Force-Quit a Stuck iDisk
Wednesday January 04th 2006, 10:25 am
Filed under:
OS X / MacOSApple’s iDisk is meant to be an easy-to-use alternative to sending files over the net by FTP. Normally, you first rent the space you need, and then access it with OS X’s “Connect to Server” command. (For frequent visits, it might be simpler to use a free or inexpensive FTP program.)
When you rent iDisk space from Apple, on the other hand, it immediately appears like any other disk on your system, and you just copy files to and from it transparently.
Unfortunately, as well as being more expensive, this process seems to be a bit more error-prone. Sometimes iDisks freeze, and you can’t Force-Quit them like you can an ordinary program.
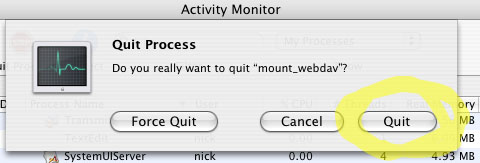
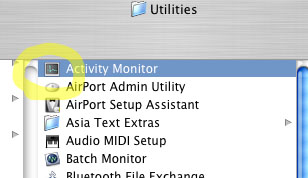
Step 1. First, go to your Applications folder, find the Utilities folder, and open up your Activity Monitor. Unlike the window that appears when you give the Force Quit command, the Activity Monitor will show any hidden programs you have running in the background.
Step 2. Find the program, or “process,” called mount_webdav. Click on the “stop” button.
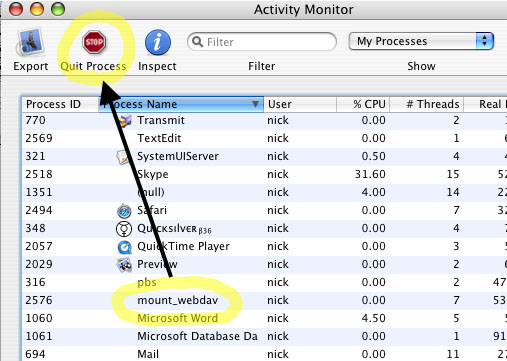
Step 3. Confirm that you want to close your crashed iDisk. You can now reconnect and resume what you were doing, without rebooting your whole machine. Any files you were in the process of copying are probably incomplete, and need to be copied over again.